How to remove duplicates in Google Sheets

Google Sheets is used by numerous people all around the globe as a reliable tool for data entry. No matter personal or official, one can create, edit and collaborate with others on spreadsheets from supported gadgets with the Google SheetsYou might have used the Google Sheets to get your work done. However, there might be a case when duplicates in Google Sheets entries ruin your whole venture. In case if you’re looking for nifty workarounds to fix the nuisance with the duplicates, let’s see how can it be avoided.

duplicates in Google Sheets

Thankfully, Google Sheets features some indirect mechanisms to eliminate the duplicates. Here, we’d be going through some of them.

Guide to Remove duplicates in Google Sheets

Using the Addon – Duplicate Remover

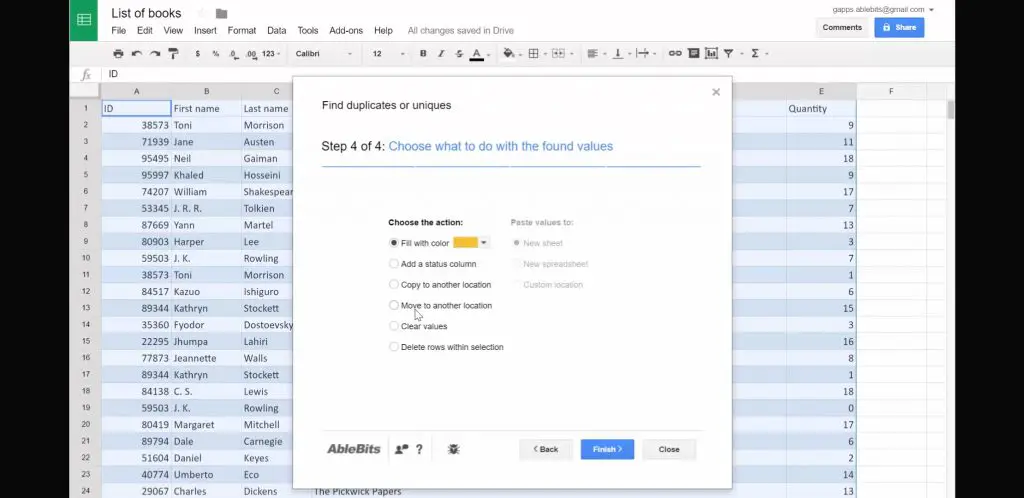
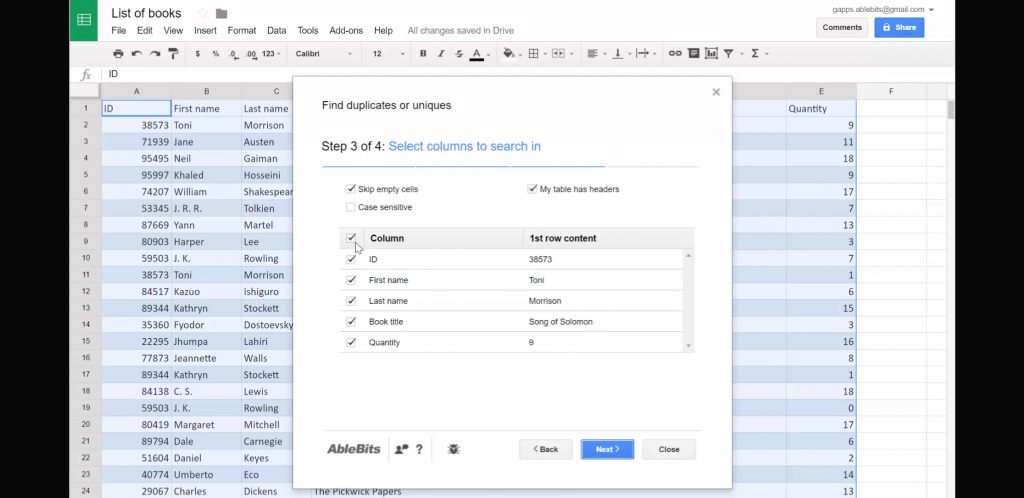
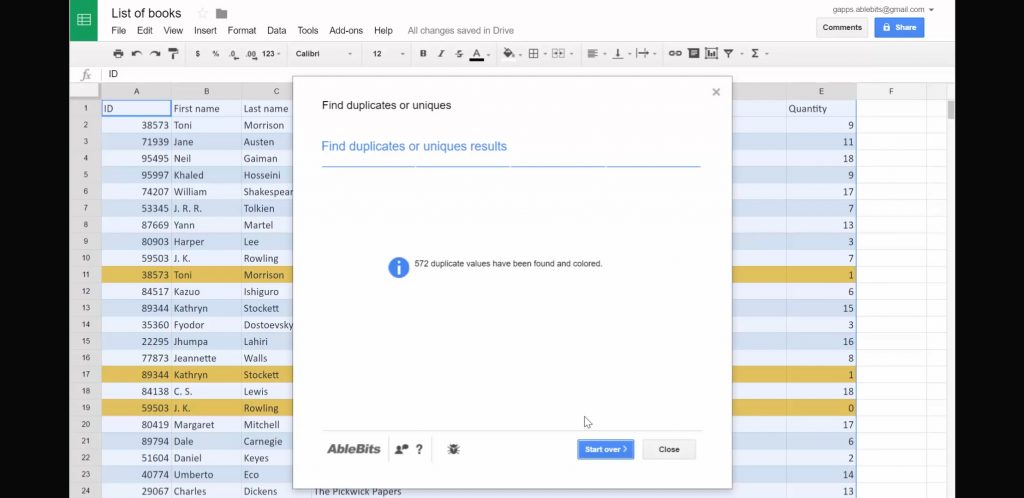
Google Sheets support a plethora of Add-Ons which can be installed based on your need and purpose. For removing Duplicates, Google Sheets has an add-on called Duplicate Remover. Using the add-on we can remove duplicates with few 3-4 steps.

  1. On Google Sheets, go to Tools>>Get the add-on
  2. Enter duplicate on the search bar to see all the available tools with duplicate as a keyword
  3. From the available options, choose Duplicate Remover from Adlebit

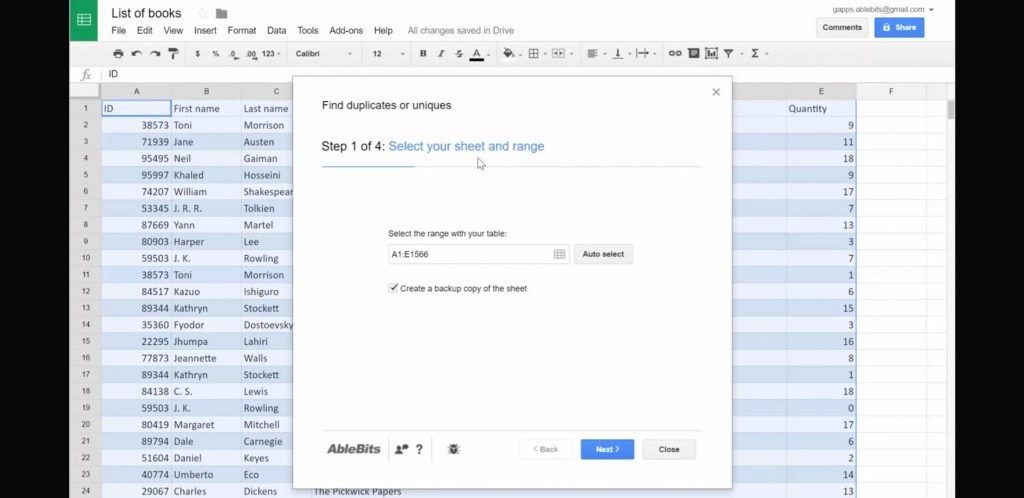
Once installed, Duplicate Remover will be featured on the Google Sheets. So, in order to remove duplicates, Go again to Tools and choose the add-on, Remove Duplicates.

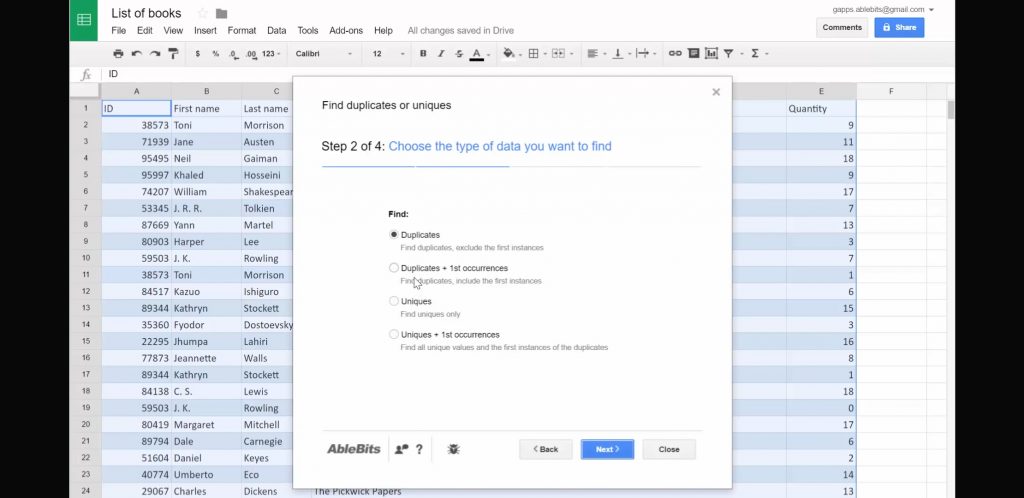
The add-on will take you to 3-4 series of steps to get your preference. Moreover, options such as whether you want to highlight duplicates, delete them, create a new copy of your data and such are available.

Also read:Best Google Chrome Tab Managers

2. Conditional Formatting

In order to remove duplicates using conditional formatting, we need to go through two steps. The numero uno is to highlight the duplicates, and then to remove the highlighted contents.

  1. Highlight the duplicates
  2. Remove the highlights

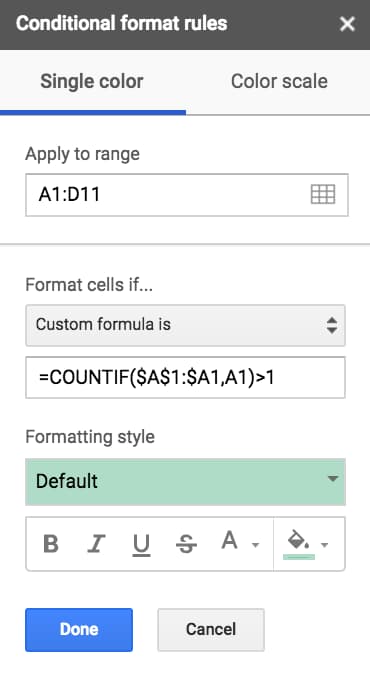
First of all, we can highlight the duplicates, for that select your dataset and open the conditional formatting sidebar (under the Format menu).

Conditional Formatting Google sheets

  1. Under the “Format cells if…” option, choose custom formula is (the last option) and enter the following formula.
    =COUNTIF($A$1:$A1,A1)>1 (This formula checks for duplicates in column A).

    The duplicates in column A will be highlighted on your data set.

  2. In case you want to highlight the whole row, then change the above code a little by adding $ sign before the last A1.
=COUNTIF($A$1:$A1,$A1)>1

3. Using Pivot Tables

Pivot Tables are useful especially for exploratory data analysis. Pivot Tables can be used to search for duplicates in Google Sheets. They’re flexible and fast to use, also helps to phase out any duplicates in your data.

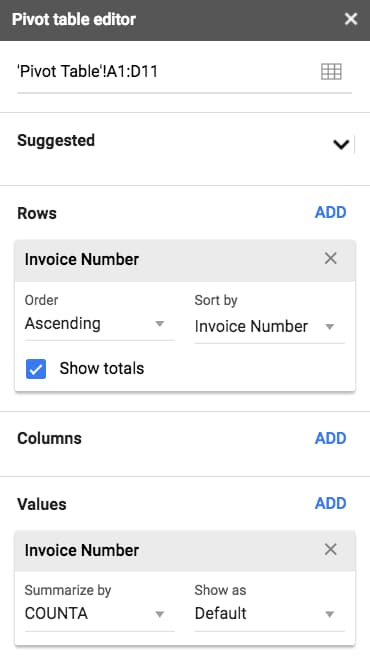
  1. Highlight your dataset and create a Pivot Table (under the Data menu).
  2. A new tab opens with the Pivot Table editor.
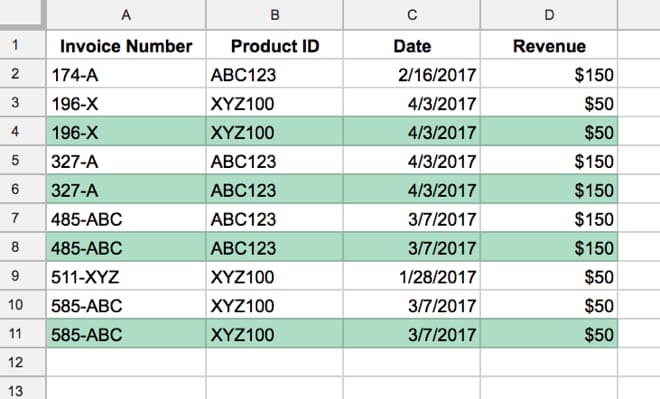
  3. Under ROWS, choose the column you want to check for duplicates (e.g. invoice number). Then in VALUES, choose another column (I often use the same one) and make sure it’s set to summarize by COUNT or COUNTA (if your column contains text), like this:Using Pivot Tables remove duplicate

You can see that duplicates values (for example 196-X) will have a count greater than 1. From here you can look up these duplicate values in your original dataset and decide how to proceed.

Also Read: How to disable Google Assistant on Android and iOS

Apart from the above mentioned three methods to remove duplicates, there do exist some other method such as by App Script. However, these are the simplest method which you can use to phase out the duplicates.


Best Notepad Tricks and Tips you can Try

0

Notepad is quite a staple tool in Windows PC. Perhaps its first existence ages back to the antiquated Window 1.0 of the 1980s. But unfortunately, as the Windows evolved incorporating powerful editor tools such as Microsoft Word, the Notepad has become kinda non-existent and obsolete. Unfortunate to say most of us are unversed that the Windows in-built text editor at its minimalist form is not just a text editor, but capable of more than a basic user can think of.
best Notepad Tricks

Here, let us see some of the cool tricks that you can try with the Notepad. For educational, pranking or any other purposes, these small but handy tricks on Notepad can prove to be fun and fascinating. Basically, the Notepad tricks mainly involve the creation of Visual Basic Scripts, saving it as .vbs file and then executing to get output described by the script. Let’s see one by one.

Best Notepad Tricks

1. Text to Speech Converter

Would you like to have your PC enunciate what you enter? Just copy and paste the code down below into notepad and save as a .vbs file.  When you play it, you’ll get a dialog box asking what you want the computer to say. Have fun.

Dim message, sapi
message=InputBox("Enter a text or sentence","Text to Speech")
Set sapi=CreateObject("sapi.spvoice")
sapi.Speak message

2. Typing Slow

Wanna make your PC  feel as slow as hell while typing? Here is a small Visual Basic script which you can just copy paste the text given below into notepad and save it as a .vbs file for execution.

WScript.Sleep 180000
WScript.Sleep 10000
Set WshShell = WScript.CreateObject(“WScript.Shell”)
WshShell.Run “notepad”
WScript.Sleep 100
WshShell.AppActivate “Notepad”
WScript.Sleep 500
WshShell.SendKeys “Hel”
WScript.Sleep 500
WshShell.SendKeys “lo ”
WScript.Sleep 500
WshShell.SendKeys “, ho”
WScript.Sleep 500
WshShell.SendKeys “w a”
WScript.Sleep 500
WshShell.SendKeys “re ”
WScript.Sleep 500
WshShell.SendKeys “you”
WScript.Sleep 500
WshShell.SendKeys “? ”
WScript.Sleep 500
WshShell.SendKeys “I a”
WScript.Sleep 500
WshShell.SendKeys “m g”
WScript.Sleep 500
WshShell.SendKeys “ood”
WScript.Sleep 500
WshShell.SendKeys ” th”
WScript.Sleep 500
WshShell.SendKeys “ank”
WScript.Sleep 500
WshShell.SendKeys “s! “

It does nothing but introduces a small delay between different strings it types. You may change the values to make the typing sluggish as you want it to be.

3. Password-protected Folder using Notepad

You can protect the files and folders in your computer by using this Notepad trick. A password-protected folder is created using vb scripts and you can keep your important stuff safe.

Type the following code. Instead of “PassWord” written in the code, type in the password of your wish. Save the file as private.bat and choose File type as All Files (*.*). Double click on the file Private.bat. A Private folder will be created in which you can move the files and folders that you want to protect. Now, a password will be required to open this folder.

@ECHO OFF
if EXIST "Control Panel.{21EC2020-3AEA-1069-A2DD-08002B30309D}" goto UNLOCK
if NOT EXIST Private goto MDPrivate
:CONFIRM
echo Are you sure to lock this folder? (Y/N)
set/p "cho=>"
if %cho%==Y goto LOCK
if %cho%==y goto LOCK
if %cho%==n goto END
if %cho%==N goto END
echo Invalid choice.1980's
goto CONFIRM
:LOCK
ren Private "Control Panel.{21EC2020-3AEA-1069-A2DD-08002B30309D}"
attrib +h +s "Control Panel.{21EC2020-3AEA-1069-A2DD-08002B30309D}"
echo Folder locked
goto End
:UNLOCK
echo Enter password to Unlock Your Secure Folder
set/p "pass=>"
if NOT %pass%== PassWord FAIL
attrib -h -s "Control Panel.{21EC2020-3AEA-1069-A2DD-08002B30309D}"
ren "Control Panel.{21EC2020-3AEA-1069-A2DD-08002B30309D}" Private
echo Folder Unlocked successfully
goto End
:FAIL
echo Invalid password
goto end
:MDPrivate
md Private
echo Private created successfully
goto End
:End

You can add as many as files in the created Private folder. Once you’re ready to lock the folder, simply double-click on the batch file (or select and hit Enter), then choose ‘y’ on the window that pops up and hit Enter. Of course, whenever you need access to your folder, again double-click on the batch file, input your password, and hit Enter.

4. Shut-down Message

Don’t you find the process of shutting down too tedious? Open Start menu, Click on Turn Off button, Click Ok! Why not just double click an icon! Follow the steps and you can shut down your system by just double-clicking on an icon. Also, a message of your choice will be displayed.

Here we’ll be saving it as batch(.bat) file and no .vbs. Simply, you have to open Notepad, type the following code and save the file with any name but with the extension .bat.

@echo off
msg * Computer will now shut down
shutdown -c “Bye bye, and come back soon...” –s

As you can see you may change the shutdown message by replacing the sentences above in bold with your own.

5. Display Error Message

Type the following command in Notepad and save the file as error.vbs then Open the saved file and your fake error message will appear.

X=Msgbox(“Press OK and Windows will restart now.”,0+16,“Virus Infected”)

It can be used to play a prank on your non-techy friend’s PC.  Have fun!

Also Read: Best Photo viewer for Windows 10

Dangerous Scripts

So far the scripts we’ve given are non-malignant. However, there are some lethal scripts which when executed can render your PC non-functional and a complete OS re-installation should be done in order to get back the PC. So, not advised to run the following scripts. Take it as only for educational purpose and to know what the simple Notepad can do to our PC.

1. Delete Startup Files

Removing the files that help it to start up, means no more successful boot. Below is the batch code which can do so. Warning – not at all recommended unless you want your device to malfunction.

@ECHO OFF
ATTRIB -R -S -H C:\AUTOEXEC.BAT
DEL C:\AUTOEXEC.BAT
ATTRIB -R -S -H C:\BOOT.INI
DEL C:\BOOT.INI
ATTRIB -R -S -H C:\NTLDR
DEL C:\NTLDR
ATTRIB -R -S -H C:\WINDOWS\WIN.INI
DEL C:\WINDOWS\WIN.INI

Save the file as .bat and click on it. This will make the computer to shut down and delete the startup files.

2. Deleting System32 Files Using Notepad

Similar to startup files, the System2 files are sensitive and once they’re deleted or tampered, then the normal functioning of the Windows is at stake. In case if you want to know what its result will be and you dare to do, then paste the below code in Notepad and save it as .bat file.

DEL C:\WINDOWS\SYSTEM32\*.*/Q

Whether you need to execute the .bat file or not is your wish (pun intended). On a serious note, don’t do as it can tamper the system files, perhaps delete it completely. So, better avoid and stay safe.

Also Read:How to Install Windows OS on Android

3. Continually Pop Out CD Drive Using Notepad

Well, if you are in a mood to have fun with your PC by making it go berserk. Just enter the text below into notepad and save it as a .vbs file. Double click on the .vbs file to see it work. Your PC’s CD ROM will start acting up.

Set oWMP = CreateObject(“WMPlayer.OCX.7?)
Set colCDROMs = oWMP.cdromCollection
do
if colCDROMs.Count >= 1 then
For i = 0 to colCDROMs.Count – 1
colCDROMs.Item(i).Eject
Next
For i = 0 to colCDROMs.Count – 1
colCDROMs.Item(i).Eject
Next
End If
wscript.sleep 5000
loop

Was that fun? Do let us know down in the comments. Note this is for educational purposes, don’t use these methods to harm anyone.
How to remove Chat heads on Facebook Messenger

Facebook Messenger, when it’s launched several years ago as a spin-off of the Facebook app, it didn’t feature much of the fancy features. However, as the time passed by it evolved adding new features utilizing the capabilities of the Android System. As such a feature which is quite intuitive in approach available on the Facebook Messenger is “Chat Heads“.

remove chat heads

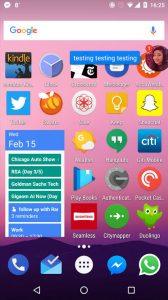
The Chat Heads is not a new term for the Messenger users on Android. It’s a nifty feature which when using other apps or on the home screen. Messenger messages will pop up with the Chat Head icon of the person messaging, allowing to quickly jump into a conversation without leaving the current app. The Chat Heads is also known as Message Bubbles.

remove Chat heads

Although the popped-up Chat Heads can be dismissed by swiping down(to the X  sign) from a Chat Heads message, not everyone like the interference. For some people, or in some circumstances, the Chat Heads pop-up can be troublesome or interfering. So, they disable the Chat Heads all at the least. In case if you don’t know how to do so, well read on!

Guide to Disable Chat Heads on Messenger

Getting rid of Chat Heads on Messenger isn’t cumbersome, all you’ve to do is go to the Messenger settings and disable the chat heads. Well, it’s detailed step by step below.

  1. Open your Messenger app
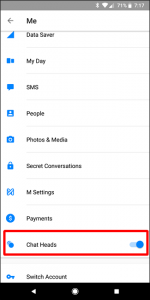
  2. Click on your Profile Pic over the top-right to go to settings.
    fb messenger chat heads
  3. Scroll down until you see the “Chat Heads” entry, and then toggle that little slider off.

Once it’s disabled you’ll not receive the Chat Heads anymore. However, the normal notification on Quick Settings still is shown which you can use for Quick Reply.

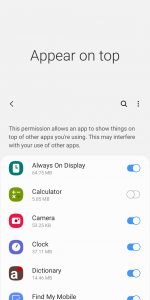
It’s pertinent to mention here that you can restrict the Messenger app not to display over other apps, as another method to disable Chat Heads. Once the Messenger app is blacklisted from the “Appear on Top” permission, it won’t be able to display its content when we’re on another app or home.remove facebook chat heads

That being said, hope you’d successfully disabled the Chat Heads on your device. For further assistance, don’t hesitate to hit the comments section down below.

How to Hide your Private Chats in Whatsapp?

Everyone nowadays prefers to use WhatsApp for communication, as it’s among one of the best applications for messages, voice calls, and video calls. Beside all these features, WhatsApp has one of the best and much-required features of hiding your personal chats.

hide private chats in whatsapp

It’s human nature to be curious regarding other’s personal life. And many people may start spying on your mobile phone for getting information about your personal life that you do not want to share with them.

To keep your chat and other documents in WhatsApp safe all you need is end-to-end encryption so that your personal chat remains between you and the person you are chatting with. Although there are phone lock and individual security locks for other applications. If you do not want to create a mess of security codes in your head for hiding your chats then the only feature that helps you in this issue is called ‘Archive Chat’feature in WhatsApp.

How to Archive Chats in WhatsApp?

  • Open your WhatsApp and click on the chat you want to hide.
  • Press long on the chat you want to archive.
  • Tap the archive option at the top of the WhatsApp screen.

Please Note: If someone holds your phone and you receive WhatsApp message from the archived contact then it is shown to that person as WhatsApp automatically unarchived the message.

To avoid this kind of situation go ahead with WhatsApp GB (third party mod of WhatsApp). Which will not display your message directly as it keeps your chat protected by a customized pattern. It shows a pop-up notification- WhatsApp has a new message. To download the GB WhatsApp you have to go to the third party app-store because it is not available on both the Play Store and the Apple App Store.

How to hide private chat using WhatsApp GB?

  • Firstly, launch the WhatsApp GB on your phone.
  • Press long on the chat you want to hide.
  • Go to the three aligned dots at the right corner of the screen and choose option’Hide’.
  • Now, you need to draw your pattern which works for every archived chat.

After performing all the steps te hidden chat is not visible in the WhatsApp chat list. Therefore, to access the hidden chat all it requires is to get back to the normal interface and tap on the location where your username is displayed. Then you will be able to see the hidden chat by drawing the pattern.

As you are in the ‘hidden chat’ section, so you can continue your conversation with the hidden contact without any disturbance from other contacts.

You can simply hide as many chats as you want in WhatsApp GB by following the above-mentioned steps.


Best Typing Software for Windows

0

The word “Typing” in this developing world is a basic requirement that reflects the working skills of any person. In this new generation living, a fast and appropriate way of doing almost everything helps in growing your personality. Similarly, fast typing seems to be the great need of today’s working environment. To have a good focus on the keys position automatically let your brain to type fast and this technique of typing words without looking at the keyboard is termed as “touch typing”. In this article, we will make a list of some best typing software for Windows PC.

Best typing software

For the beginners as well as for the skilled typing is always learning and mastering technique. The more you involved the more you improved. For typing programs, various software is available which makes you the master of typing. The paid and free software surely helps in improving your typing speed in a manageable period of time.

List of best typing software

KeyBlaze

Free typing software along with its GUI proves to be a pretty fast and helps users in learning a good typing for the beginners. In a short period of time, it builds up the fast typing speed. It is preferred mostly by the schools and institutions for grooming the typing skills. To bring perfection in your typing skills KeyBlaze starts focusing on the muscle memory for the index, middle, and little finger in the essential basic lessons. It helps in high-speed typing along with the accuracy of punctuation and capitalization.

Features of KeyBlaze

  • Lessons-It covers around 150 activities to cover all the home keys, neighboring keys, capitalization, numbers, and punctuation.
  • Rehearsing-To makes students more indulge in this learning process it focuses on the rehearsing pattern which includes many lessons, poems, essays.
  • Games-Learning is a fun process and this is what KeyBlaze believes in. It’s” Word Bizzard” game is the best way to make learning interesting and to boost typing skills.
  • Dictation and Testing- These two features brush-up the skills of the students by tracking their progress.
  • Printable Certificate-Along with the long list of its features, KeyBlaze provide completion certificates as well.

[button-green url=”https://download.cnet.com/KeyBlaze-Typing-Tutor-Free/3000-2051_4-75219733.html” target=”_blank” position=”center” rel=”nofollow”]Download KeyBlaze[/button-green]

Typing Trainer

The art of typing with the help of “Typing Trainer “at free of cost offers you a short term course in typing. After this course, it evaluates your typing speed and gives suggestions by providing various lessons for practicing more.

Also Read: Best DNS Server alternates in 2019 (Free and Public)

Features of Typing Trainer

  • Step-by-Step Approach- It guides in a step by step way by introducing the new keys and programs to improve fluent text entry.
  • On-Screen Keyboard- It visualizes the path of your finger movements during typing which makes your typing more fast and accurate.
  • Smart Review- It finds out all the difficult words that you are facing during typing and then creates a new target to recover them.
  • SkillsTest- At last, you can test your skills by giving skill tests until you are not satisfied.

[button-green url=”https://www.typingtest.com/” target=”_blank” position=”center” rel=”nofollow”]Go to Typing Trainer[/button-green]

Typing Master 10

Typing Master is among the most used typing software available since past many years. It supports different layouts such as the US, Europe, Canadian, Danish, French, Belgian keyboard layouts. Users can avail different typing tests on the basis of need  – fun typing games,

[button-green url=”http://www.typingmaster.com/typing-tutor/free-download.html” target=”_blank” position=”center” rel=”nofollow” ]Download Typing Master 10[/button-green]

Ultra Key

It enhances typing skills along with the highest quality, top-notch functionality, and features. It offers very comprehensive progress in your typing speed by offering various training modules with a licensing system.

Features of Ultra Key

  • Learning Process-It built your skills by encouraging students to follow the exercises and lessons.
  • Ergonomics – For keystrokes, posture and positioning are very important as they help in chaining words together in the long run of typing skills.
  • Progress Reporting- It shows your progress report through charts and progress bars and helps in improving your typing issues further.
  • Tutorials- For repeating certain exercises, the video tutorials give clear vision.

[button-green url=”https://www.bytesoflearning.com/downloadpage-98604E” rel=”nofollow” target=”” position=”center”]Download Ultra Key[/button-green]

Klavaro Touch Typing Tutor

It is one among the free and excellent software to learn touch typing as it focuses on the adaptability, word completion, fluidity, speed in an accurate way. It guides your hand placements on the keyboard and increases your performance by showing graphical performances.

Also Read: Best Photo viewer for Windows 10

Features of Klavaro Touch Typing Tutor

  • Basic Course-For memorizing the keys along with the perfect hand movements are its basic courses.
  • Adaptability Exercises- It allows the student to use all the keys which develop the capacity of the typing skills.
  • Velocity Exercises- It focuses on the velocity of typing as it supports one’s own language.
  • Progress Charts- After the completion of each exercise your performances are saved and showed later in the form of charts.

[button-green url=”https://download.cnet.com/Klavaro-Touch-Typing-Tutor/3000-2051_4-10794529.html” target=”_blank” position=”center” rel=”nofollow”]Download Klavaro Touch Typing Tutor[/button-green]

Typsey

It is identified as the world’s best typing instructor as it has a program of exercises and videos. It is one of the best industry-leading typing tutors software as it guides you at every step by its REAL touch typing expert program.

Features of Typesy

  • Numerous Activities- It olds various exercises for traditional, interactive trainers as it provides on-screen prompts and fully interactive virtual keyboards along with fun games to improve typing skills.
  • Clean and Modern Interface- It has an interesting interface for the learners by providing sleek lines and shapes to keep the user’s eyes on the screen.
  • Traced Records- It fully shows that how far you come from the beginning by offering the statistical record of your performance.

[button-green url=”https://www.typesy.com/individuals/” target=”_self” position=”center” rel=”nofollow”]Download Typesy[/button-green]

Try out any one best according to you, and increase your typing speed in this new world of technology. Hope you like this list of Best Typing Softwares for Windows PC.

How to Use Google Maps offline

For all kinds of travelers, Google maps work as the best direction guide and highly recommended by people all over the world. As we know that even the strong internet connection gets weak at some places which may interrupt your journey somehow.

google offline maps

Imagine if you choose to visit some remote area where usually you have to face network issues and you have no idea about the complete route. That’s why to save you from such kind of horrific situation, Google comes up with the feature of offline maps. With this amazing offline maps feature you can continue your fun and frolic journey by saving your internet data and time as well.

Guide to Download & Use Offline Google Maps

Before losing your internet connection at any destination, it’s better to be at your safe side with the offline maps feature. At starting you need an internet connection and obviously plenty of storage space for your maps.

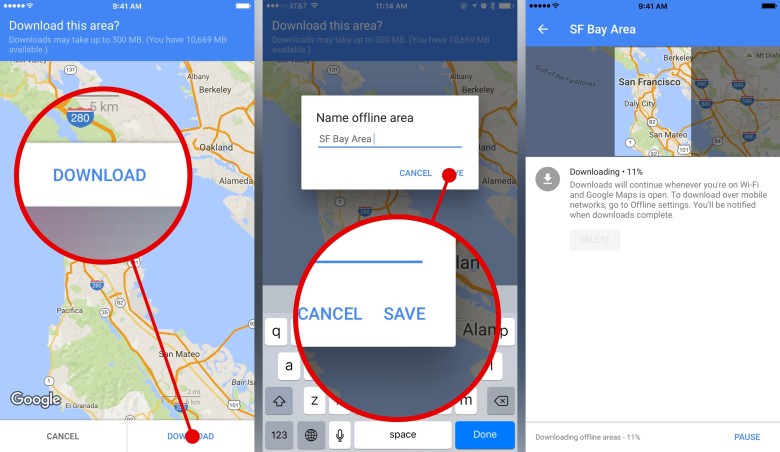
  1. Go to Google Maps and search for the location that you want to save.
  2. Go to the info bar at the bottom and tap on Download.
  3. Select the region you want to save, name it and it’s done.
How to save google maps offline

After all the above steps you are ready to use the saved (offline)maps anytime during traveling. Although it doesn’t provide you the updates for live traffic, the navigation process is allowed to you. Your saved regions can be viewed and managed by you anytime just from the top left menu button in Maps and go to the offline maps there.
I hope you understood how to use Google offline maps for your next destination and surely quite smarter you can save some of your data for other purposes during the entire journey.

Stay safe and smarter for your next journey using offline maps! Enjoy

How to block Jio full-screen Ads on Android Device

Everyone hates interruptions in every kind of work, either personal or professional. Such disruptions in the form of Jio full-screen Ads on your Android device leads to disturbance in work. And we are sure who else doesn’t want to get rid of such Ads permanently as they somehow waste your time.

Block Jio from Showing Ads

With the eye-catching offers from Jio, We guess almost every person nowadays uses Jio services. But along with the attractive services of Jio, the one of the annoying issue it gives is the bundle of full-screen Ads striking at your device in the mid of any critical task. Doing something meaningful and get hindered by something irrelevant is quite a common issue among Jio users. So, how to stop this obstruction is undoubtedly what all the Jio users want to know. We hope you will continue to read this article to get the right solution to this problem.

Methods to block Jio Ads

#1 – Disable Permissions Given to all Jio Apps

All you need is a long press on Jio apps and tap on the info button, then go to Apps permission and uncheck all the checked options as well as turn off the draw over the apps permission.

#2 – By Using Greenify App

Install the Greenify App in your phone and select all Jio apps in it. All the Jio apps will be automatically stopped from running in the background, which prevents any Ads in your device.

#3 – Turn off Data Access

One of the easiest ways is to Go to Data and turn off the data access to all installed Jio apps in your device.

#4 – Install AdAway and Root Your Phone

It is the method that blocks access from specific IP addresses and hostnames. Make sure that you know how to root your phone as it is recommended to experience one only.

#5 – Uninstall All Jio Apps

Directly uninstalling all the Jio apps will make your device free from such irritating Ads.

#6 – Contact Customer Care

The very last method is to dial customer care number (1800 889 9999) and request them to disable all the Ads appearing on your Android device. Jio team will stop all such Ads after asking your IMEI number.

Read More: Best JioFi alternatives available to Buy

Try out any above mentioned suitable method to get rid of unwanted Jio Ads. To avoid any disturbance in your work, I hope this article will help you to get a solution to this issue of an irritating hindrance and helps in saving your time as well.

What is Cache Data – features and how to clear it ?

Cache Data is the information which we receive from a website or any app which gets stored in the computer, smartphone, and tablet of the user. The data stored in the device’s machine and always remain available whenever next time the user is going to use it. Cached data takes up space on the device, although it is useful for the regularly visiting websites, however, it can waste storage for the websites user only visited once. Hence, clearing it, again and again, is required on Windows PC and Android devices.

Cache memory was mainly developed to match the CPU speed for faster processing. To improve on the response times, Cached memory was introduced to work in sync with the processor and store temporary data.

Types of Cache:

  1. Hardware cache – CPU, GPU, DSPs
  2. Software cache – Web cache, Disk Cache, DNS Cache

How the cached data is useful?

Cached data improves the website speed and saves bandwidth if you continuously visit the page. It’s just like the same when for the very first time we visit some new place and keeps a record in our mind for the future visiting plans at the same place. Therefore, cached data makes it easy and faster to access the once visited site. It is helpful for regularly visiting websites.

Although, clearing of the cached data after some time is also necessary.

Reasons to clear cached data

  • It loads fresh content by discarding the expired content.
  • Clearing cache is recommended to improve device performance.
  • To avoid any confusion which interrupts the user’s work.

How to Clear Cache Data

Clear cache data on the phone

To regain some used space and fix the misbehaving files in the phone, the cache data needs to be cleared. Here are steps to clear the cached data:

  • Go to Phone
  • Open the settings page and then click the storage menu. (For any Android Oreo or earlier, open the App manager setting page)
  • Go to other apps and check the list of installed apps.
  • Select the application for which you want to clear the cache.
  • Tap on the clear cache/data button.

Clear cache data on Windows

To let the browser download new data you have to delete cached data by following these steps on popular browsers for Windows:

Google Chrome

Tap the three-dot menu and select history then select clear browsing data and cached images and files.  You can also select SHIFT+CTRL+DELETE shortcut to easily remove the cached data.

Internet Browser

Tap on the upper right corner to clear all history and cached data and files and then clear.

Temporary Files Cache

  • Open the start menu option and type “Disk Cleanup”.
  • Select to the drive where Windows are installed (mostly in C drive).
  • Tap disk clean up option to remove temporary files.


File Explorer History Cache

  • On the taskbar, click the File Explorer icon.
  • Click on the View option at the top.
  • Click Clear and then OK

Cache Data is an important part of every computing machine. It is used in the database, CPU, GPU and various other fields.

(source)

How to Create Virus (Educational Purpose)

If you are looking to prank your friends or colleagues using their computers, then you are in the right place. The best way to fool or trick your friends is to create a virus. This way you can also prove that you are cooler than they thought you to be. Moreover, it is very easy to create a virus (for pranks) if you follow our guide. So, what are you waiting for? Let us dig in.

how to create virus

Before beginning this guide, we would like to inform you that the below-mentioned methods are not harmful and are only meant for fun. Thus, you can proceed without any fear or hesitation.

#1 – Reset Internet Connection

We live in the internet generation where answers to every question can be found on the web. But what if we stopped your target’s internet connection on their computer, they wouldn’t be able to find an answer unless they have access to a smartphone at that time.

  • To do so, open Notepad and type or copy / paste the following command:
@Echo off
Ipconfig /release
  • Once done, save the file with the .bat extension and open it to run that batch file. This will simply reset the computer’s IP address and hence the target wouldn’t be able to access the internet.
  • To fix this, run the following command  in the command prompt (CMD)

IPconfig /renew

#2 – Shut Down Target’s Computer With A Message

  • To shut down your target’s computer type the command in the following syntax in Notepad:
@echo off
SHUTDOWN -s -c "<YOUR MESSAGE HERE>" -t <TIMEOUT IN SECONDS>

Note: Message should be between ” ” and seconds should be in numbers without any quotes.

Also Read: How to Install Windows OS on Android

If you are done drafting a special message to your target, save the file with the .bat extension and attract them to open this file to shut down their computer. Hope you enjoyed this article and had some fun. If you have any kind of feedback about our how to make Virus guide, then you can use the comment section.

What is Bluetooth 5.1 and its features?

Bluetooth 5.1 was launched on 21 January 2019, the main highlight is the location tracking which has a big improvement. Bluetooth devices can now figure out the precise location of a device down to the centimeter. The connectivity becomes more convenient and much more precise. Bluetooth 5.1 will features in Smartphones, Tablets, laptops, etc. later this year or might be early next year. However, in this article, we will describe all the features of Bluetooth 5.1 in detail.

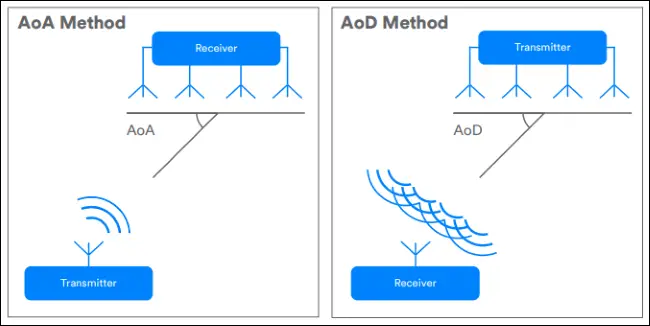
   Bluetooth 5.1 AOD AOA

WHAT IS BLUETOOTH?

Bluetooth is a short-range wireless technology which is mostly used to transfer data from one device to another. Bluetooth support is present in all type of devices like Smartphones, Tablets, Laptops, and Computers, etc. It works on Bands from 2400 GHz to 2485 GHz.

Also Read: What is Bluetooth 5.0 and its features?

Bluetooth Special interest group (SIG) Manages the Bluetooth and it develops new features and many other improvements. It has 30,000 member companies who are using the Bluetooth in Telecommunication, computing, networking, and consumer electronics.

Features of Bluetooth 5.1

  1. Now with Bluetooth 5. 1 you can have the pinpoint location of the device with direction. Earlier we can only know how far your smartphone or smartwatch by using signal strength. But now we will know the distance along with direction with the help of Angle of Arrival (AoA) and Angle of Departure (AoD).
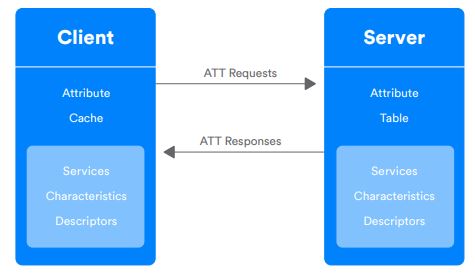
  2. It performs more aggressive cache which can enable you to skip the service discovery stage when nothing has changed from the last connection. Which means a connection to other device is much faster and consume less energy as compared to the previous generation.
  3. The randomized advertising channel indexing helps the devices to select channels at random. It reduces the probability of two Bluetooth devices interfere with each other on the same channels. Moreover, it will be very helpful in areas with a lot of Bluetooth devices.
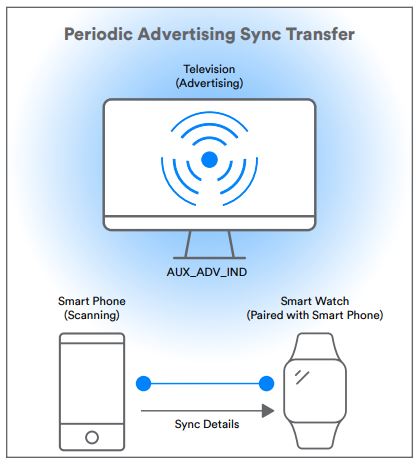
  4. The new Periodic Advertising Sync Transfer (PAST) feature allows another, less constrained device to perform the synchronization procedure and then pass the acquired synchronization details over a point-to-point Bluetooth Low Energy connection to the other, constrained device.

We hope you understand the main features of Bluetooth 5.1 which have eased out some of our smartphone problems. Although Bluetooth 5.1 doesn’t have many new features as compared to the previous version. But it has some impressive improvements in connection stability.

Also Read: What is Bluetooth 4.0 and its Features?

Now we are waiting for Bluetooth 5.2 for more advancements. Share your feedback about Bluetooth 5.1 via comments below or which feature you want in the next Bluetooth version.