How to transfer Telegram group ownership?

Telegram messenger is an internet supported messaging app that works similarly like WhatsApp and Facebook Messenger. Users can send and receive messages for free with the help of Wi-Fi connection on mobile data allowance. The Telegram was founded by a Russian social network VK, by brothers Nikolai and Pavel Durov in 2013. The Telegram groups are popular for a lot of reasons. In today’s write-up, we will guide you on how to transfer Telegram group ownership.

telegram group ownership transfer

Features of Telegram

Cloud Store – The text messages images media files documents which are sent on Telegram are saved on their cloud as Telegram has as cloud storage.

Media compression – While sending an image or a video the user has an option to choose whether to compress it or not. Telegram can send an uncompressed version too.

Group member capacity  – A normal group of 200 people can be formed on Telegram but when this group reaches the number it automatically transforms to a Super Group which can accommodate a capacity of 5,000 members. The Super Group enjoys more features and advantages than a normal group.

Username feature – Even if you do not have a contact number of a person Telegram allows you to communicate with the other ensuring the privacy of the user’s contact number.

Channels – A channel is similar to a group which can have any number of members the creator of the channel decides who can post and view a message.

Secret chat – It is a feature with an end to end the encrypted chat. This feature can be set with a self destruct timer. This allows the messages to be deleted automatically when the timer hits and it is not hackable.

Voice calls – The latest version and upgrading the app, Telegram allows and supports voice calls.

Send any kind of file – Unlike other messaging apps, sending videos, images, and document files are limited, Telegram users can send any type of files.

Disadvantages of Telegram

  • Telegram does not support video calls.
  • The delivery and read status is not informed to the sender promptly.
  • End to end encryption feature is only used for secret chats in Telegram.

With the above-stated pros and cons Telegram proves to be faster than other messaging apps. The privacy to the chats and other files like pictures videos documents are safer and secure.

Transfer Telegram group ownership

The most talked-about feature of Telegram is its groups through which the users can enjoy more as compared to other messaging apps. The person who creates a group is the owner of the group. Transferring the ownership of a Telegram group comes handy when you need to pass on the responsibility of being the owner to someone else in the group. You just have to be sure that the new group owner would take full control and responsibility of the group.

Procedure to Transfer:

  1. Open the Telegram App on Android/iOS.
  2. Search the group by scrolling down the conversation list or by typing the name of the group in the search bar.
  3. Open the group and tap the group name.
  4. Now, tap the Administrators >Add administrator>Select User.
  5. After selecting the contact, toggle permission for a new administrator.
  6. Once done, tap on the Transfer Group Ownership option.
  7. Select the transfer option.
  8. A message will appear informing about the transfer of ownership rights to the selected person.
  9. If you are sure, then select change owner option and the ownership will get transferred.

Make administrator in Telegram group

If you do not want to give up full ownership rights of a Telegram group you have an option to make someone an administrator. The process again is least time-taking and easy. You have to follow the above steps, but instead of typing on “transfer group ownership’ option, “add new admin” option needs to be selected.

Rights as an Administrator:

  • Permission to change group info
  • Delete any messages
  • Ban users
  • Invite users via a link
  • Pin messages
  • Add new administrators

Edit Administrator Rights:

The owner of the group and the admin of the group do not enjoy the same advantages.

  1. The owner can edit the admin rights by tapping on the three dots present on the right of the user’s name and select edit admin rights.
  2. Toggle off the permissions you do not want the person to enjoy and save your changes.
  3. Tap on the checkmark at the top right to confirm whether changes have saved.

You have the power to be the owner of a Telegram group with these powers you have a great responsibility and to use them wisely is a bigger responsibility.

Read More: How to Hide your Private Chats in Whatsapp?

How to enable Hibernate option in Windows 10

A number of power options are available in Windows 10. Hibernate is one such option designed especially for laptops. Here in this article, we will guide you step by step on how to enable Hibernate option in Windows 10 since it does not come turned on by default.

enable hibernate option Windows 10

First things first, before going through the guide on how to enable hibernate option in Windows 10, let us understand what is hibernate and how to hibernate is useful on laptops.

Windows 10 includes many power options similar to its previous iterations. The options include Shut down, Reboot, Sleep and Hibernate. The Shutdown and Reboot options are self-explanatory, the former completely turn off your computer and the latter restart your computer after turning it off. Whereas, Sleep and Hibernate are the only options that are not understood by many users.

Talking about Sleep, it merely pauses your current work and turns off the display. Thus, once you turn on your machine again, the work you were doing before will be resumed instantly. Therefore, it consumes some amount of battery power which can be an issue if you don’t use your laptop for a long time. The solution for this is the Hibernate option which saves your ongoing working on the hard disk and then turns off your laptop partially. And hence, it consumes less power as compared to Sleep but also takes more time to turn on which however is negligible.

Therefore, at the end of the day, the Hibernate option is much better than Sleep option on laptops running Windows 10. Now as we are done with the functions and uses of Hibernate, let us go through the guide on how to enable it on your laptop.

How to enable Hibernate option in Windows 10

Step 1 – Open Control Panel.

Step 2 – Change the view to Large Icons.

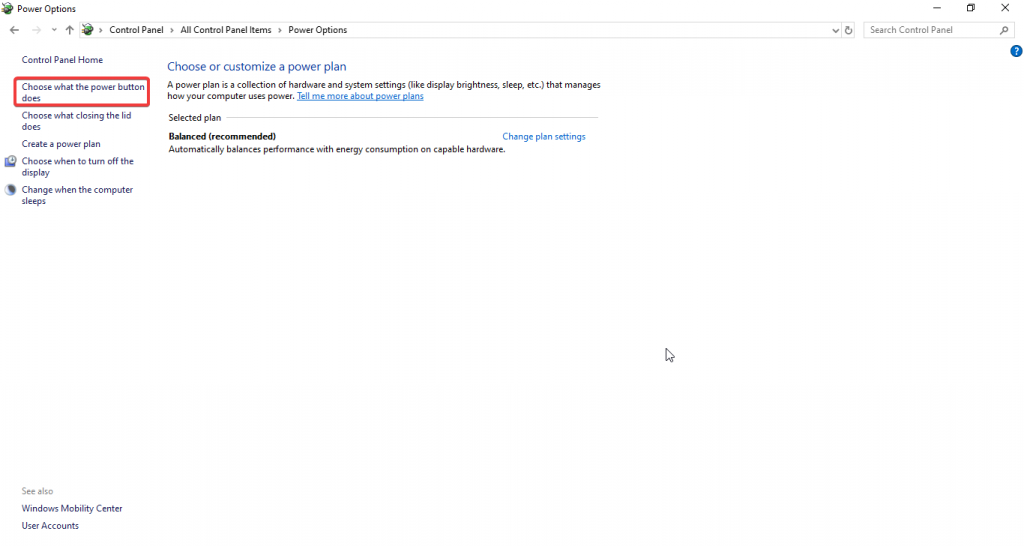
Step 3 – Select Power Options.


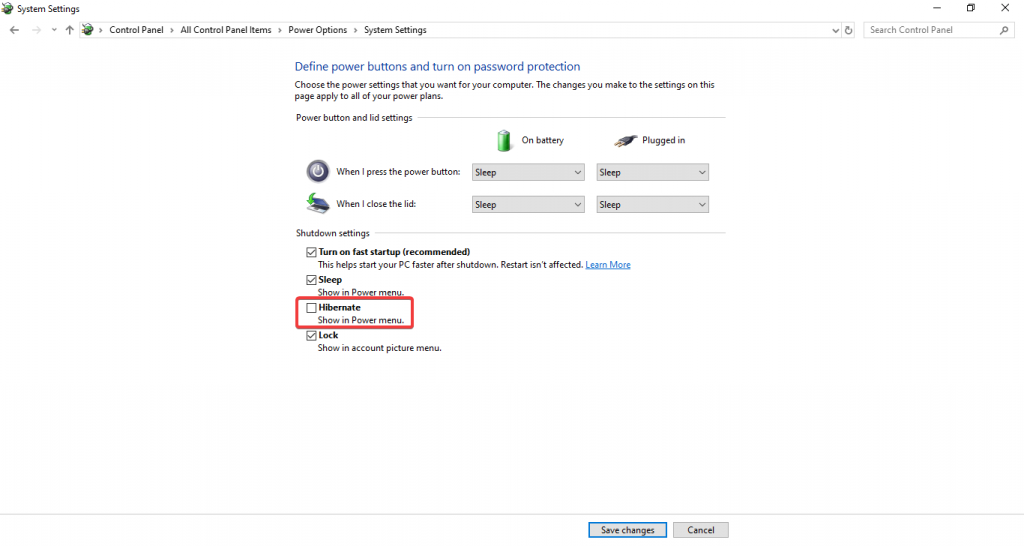
Step 4 – Click on Choose what the power button does option located on the left side.

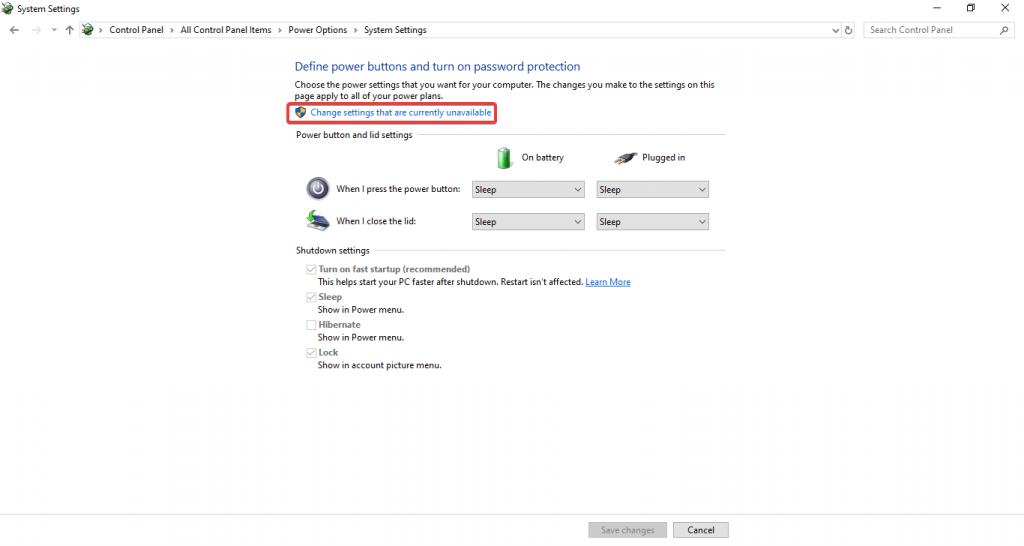
Step 5 -Then, click on Change settings that are currently unavailable.

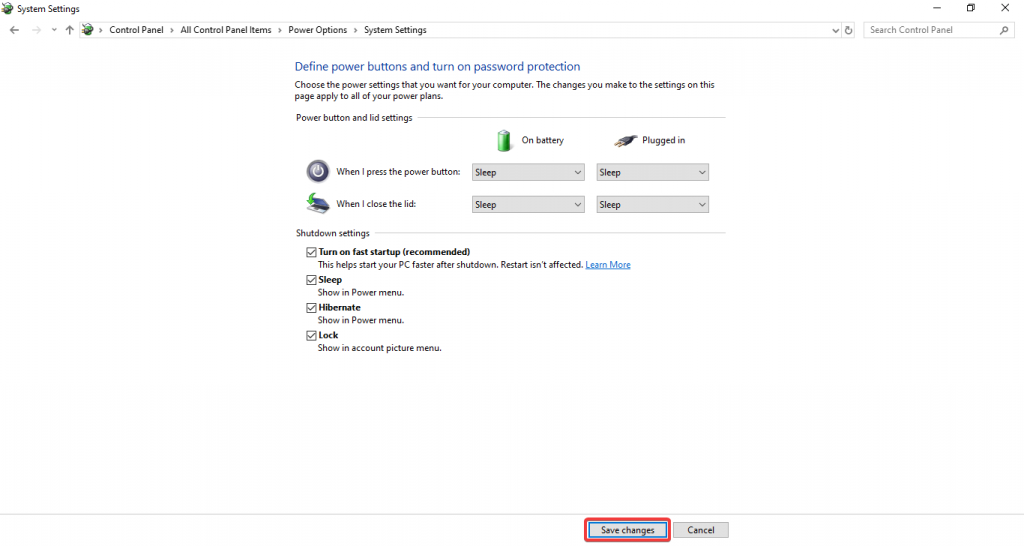
Step 6 – Finally, tick the Hibernate option and click on Save changes.

That is it, you have successfully enabled Hibernate option on your Windows 10 machine. You can find it under Power options from the Start menu.

How to unlock bootloader of Redmi Note 7

0

Xiaomi’s yet another hit device, the Redmi Note 7 is a force to reckon with in the budget-segment. With Xiaomi selling millions of Redmi Note 7, the device is now the daily driver of many. Here we’ll discuss the method to unlock the bootloader of Redmi Note 7. So read on.

unlock bootloader Redmi Note 7

It goes without saying that, bootloader unlock factory resets the device. So do take a backup of your device data before proceeding.

Guide to Unlock Bootloader Redmi Note 7

Pre-requisites

  • ADB and Fastboot installed
  • MI flash tool
  • Xiaomi USB drivers

(All download links are given at end of the post)

Make sure you’ve got the aforementioned tools and ready with your PC. Then, follow the steps given below one by one.

Mi Unlock Request

  1. Enable “OEM unlocking” and “USB debugging” in your device
    a. Enable Developer Options in Settings/About Phone/MIUI version. Click on MIUI version seven times
    b. Now go to Settings/Additional Settings/Developer Options and check “OEM unlocking” and “USB debugging”
  2. Check if your bootloader is locked
  3. Request Permission from Xiaomi to Unlock the Bootloader: Sign in to Xiaomi and apply for unlocking from here
  4. Connect your Mi Account to your Device
  5. Go to: Settings/Additional Settings/Developer Options/Mi Unlock status and check “Add account and device”

Unlock the Bootloader

Reiterating, unlocking the bootloader will erase all your data! So please back up your data before you unlock the bootloader!

  1. Download Mi Unlock Tool
  2. Enter the fastboot mode by holding together “Volume Down + Power” and connect your device to your computer via USB cable (best would be the original cable)
  3. Start the Mi Unlock Tool
  4. Enter your email and your password of your Mi-Account
  5. Connect your device to your computer and start the unlock procedure
  6. Follow the unlock tool instructions until the unlock procedure is finished
  7. Reboot your device

Your device should be bootloader unlocked by now. The device security features such as FRP lock is non-functional as long as it’s unlocked. However, with the unlocked bootloader, you can flash the custom recovery, root your device or try custom ROMs.

In certain cases, you need to wait a couple of days after applying for the same, if you get the message, that the unlocking can be done after 72h or 360h…you’ve to wait in order to successfully unlock the bootloader.

Downloads

Any error while trying to unlock? Do let us know in down in the comments, we’ll help you out.


How to flash TWRP and Root Xiaomi Redmi Note 7

0

Gaining root access on an Android device is nowadays easy and safe. But, that doesn’t mean you can be careless while going through the root process. Even a slight mistake can render your phone useless. So, in case if you tend to root your Redmi Note 7, then go through our guide to do it safely.

Root Redmi Note 7

Before we begin, a brief description of Redmi Note 7. The Redmi Note 7 features a glass front and back with Corning Gorilla Glass 5 protection on both sides. The 6.3-inch LCD display is of FHD+ in resolution with decent quality.

Powered by the Qualcomm Snapdragon 660 Mobile Platform, the device has a dewdrop notch, a notification LED in the chin and a hybrid SIM slot. The rear 12MP coupled with 5MP depth camera should satisfy the photographer in you. Keeping the lights on is a decent 4000mAh battery which supports 18W fast charging.

That being said and without any further ado, let’s get straight into root procedure.

Prerequisites

  • Download TWRP for Redmi Note 7[Lavender]
  • Magisk: Download
  • Charge your phone at least up to 60%.
  • Install the latest USB drivers on your PC.
  • Download and install ADB and Flashboot tool.

Guide Root Xiaomi Redmi Note 7

[alert-warning]Warning: Proceed if and only if you know the risk associated with the root. Do take a full backup if your files and apps. We’re not responsible if you end up damaging the device, no matter what.[/alert-warning]

Install the TWRP Recovery

Official TWRP is not out for Redmi Note 7. However, a stable unofficial TWRP is available which we can use to root the device.

  1. Your bootloader must be unlocked. In case if you don’t know how to, read this.
  2. Download official TWRP and store on a safe folder on your PC.
  3. Go to the folder where you have put the twrp file. Now open a command window inside that folder. To do that hold together “Shift + Right click” on any empty white space inside the folder and then select “Open PowerShell Window Here” or “Open Command Window Here”
  4. Enter fastboot mode by holding together “Volume Down + Power” and connect your device to your computer
  5. Enter the terminal command in the command line:
    fastboot flash recovery twrp.img

    Important: Do not restart your device otherwise Xiaomi’s original recovery might overwrite the custom recovery twrp!

  6. Boot your device into recovery (3 possible methods)
  • by entering the terminal command in the command line:
    fastboot boot twrp.img, or
  • by holding together “Volume Up + Power” until you see the MI logo, release “Power” button but keep pressing “Volume Up” until you see the recovery, or
  • by holding together “Volume Up + Volume Down + Power” until you see recovery

Once you’ve successfully flashed TWRP on your device. Next stride is to flash Magisk via TWRP. Read on!

Also Read: How to Change IMEI number on any Android Phone

Root Redmi Note 7 with Magisk via TWRP

Magisk is the most trusted and powerful currently active root agent for Android. So, for gaining system-less root access with SafetyNet bypass, Magisk is undoubtedly good to go tool.

  1. Download latest Magisk and put it into the internal memory of your smartphone or into the micro sd-card.
  2. In the main twrp screen, click “Install”, search for the Magisk.zip file and flash it
  3. Restart your smartphone

That’s it, you should have now rooted the device. Search for the Magisk logo on your app drawer to confirm.

What is GSM? Full Form, Features, and more

We usually heard about GSM many times but we are not sure about its full form. Sometimes it’s quite surprising that how we are totally blank regarding something that we are using currently or used. GSM was a replacement for the first generation (1G) cellular networks might every person knows but have no answer for what is GSM stands for? To get informed is always the best option, so let’s read about GSM in this page.

What is GSM

Full Form of GSM

GSM stands for Global System for Mobile communication. To describe protocols for second generation (2G) digital cellular networks it is a standard developed by European Telecommunication Standards Institute (ETSI) by replacing the 1G (first generation) cellular network. It is not only used for voice calls, but it can also be used for data computing and sending text messages. By connecting a GSM-enabled phone with his laptop a user can send or receive e-mails, faxes, browse the internet, check security, etc.

Composition of the network

The GSM network has four separate parts that work together to function as a whole:

  • The mobile device itself.
  • The base station subsystem (BSS).
  • The Network switching subsystem (NSS)
  • The Operation and support subsystem (OSS).

The mobile device connects to the network via hardware. The subscriber identity module (SIM) card provides the network with identifying information about the mobile user.

The BSS (Base Station Subsystem) handles traffic between the cell phone and the NSS. It consists of two main components:

  1. The Base transceiver station (BTS)
  2. The Base station controller (BSC).

The BTS contains the equipment that communicates with mobile phones, largely the radio transmitter-receivers and antennas. The BSC communicates with and controls a group of base transceiver stations. The NSS portion of the GSM network architecture often called the core network which tracks the location of callers to enable the delivery of cellular services.

Also Read: Difference Between CDMA and GSM Mobiles Phone |GSM vs CDMA

GSM aka Global System for Mobile Communication mainly follows the three frequencies:

  • 900 MHz: Used by the original GSM system.
  • 1800 MHz: Used to support the growing number of subscribers.
  • 1900 MHz: Used in the US mainly

Advantages of GSM

  • Vast Coverage- GSM users essentially have coverage in over 218 countries. It has a harmonized spectrum, which means that even though different countries may operate on different frequency bands, users can transfer seamlessly between networks and keep the same number.
  • Phone Variety for Users- It is used throughout the world; there is a greater variety of phones that operate on GSM. Therefore, consumers have more flexibility in choosing a handset that fits their specific desires.
  • No Roaming on International Calls-Users is not charged a roaming fee for international calls because GSM is the same network worldwide.

Disadvantages of GSM

  • Electronic Interference- As GSM uses a pulse-transmission technology due to which such interference occurs. As a result, many locations such as hospitals and airplanes require cell phones to be turned off.
  • Bandwidth Limitation– GSM is that multiple users share the same bandwidth which can encounter transmission interference. Therefore, faster technologies, such as 3G, 4G have been developed on different types of networks than GSM, avoid such bandwidth limitations.


How to unlist & remove phone number from Truecaller Database?

0

Truecaller is a mobile app developed by a Swedish Company, True Software Scandinavia AB. It is popular for global call detail indexing and social media integration by keeping the phonebook up-to-date with pictures and birthdays. Simply, it helps provide the identity of an unknown number frequently. It is a guide for users looking to unlist phone number from Truecaller database.

How the Truecaller works effectively?

It is an impressive app providing information regarding any phone number. The question is how Truecaller received this info? Well, to let you know, Truecaller asks for contacts permission whenever you install the app on your device. It synchronises all the contacts to its servers and makes them public.

The contacts detail remain public even if the user stops using the Truecaller App after some time. Once your number gets into the Truecaller directory, it won’t be easy to unlist it from the directory.  It is difficult to unlist because any person who already has your contact in his/her contact list and using the Truecaller allows that person to access your details in his phonebook.

Well, there’s a way through which you can easily unlist your phone number from Truecaller. Follow the steps below:

How unlist phone number from Truecaller?

truecaller unlist

The whole criteria of unlisting your number from Truecaller follow steps below:

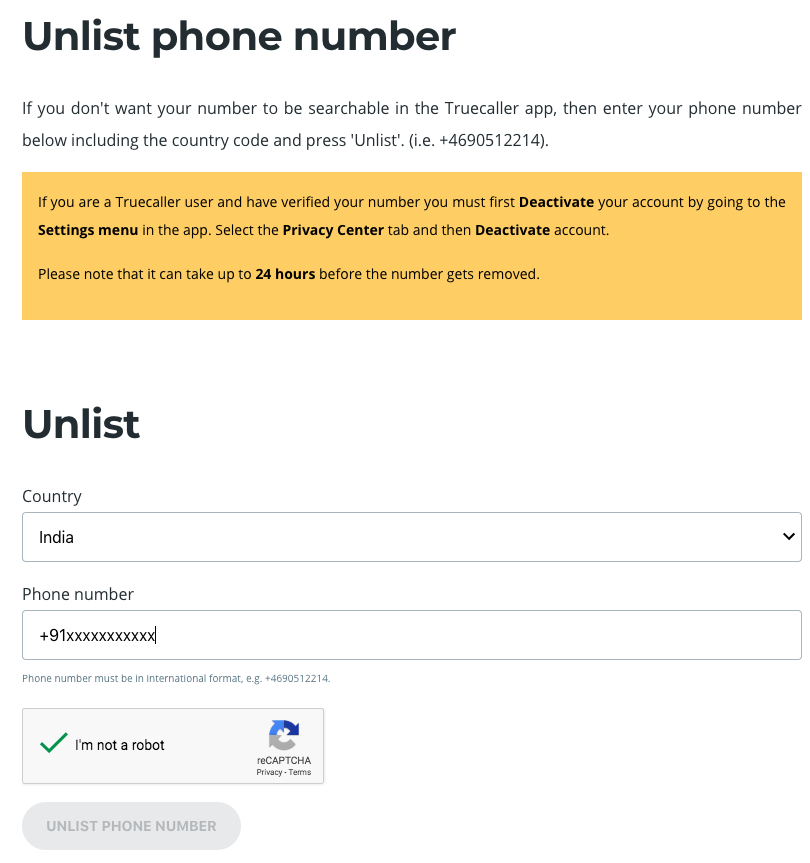
Step 1. Start by using an official website www.truecaller.com/unlisting

Step2. Enter the number which you want to remove.

Step3. Confirm “I’m not a robot” option.

Step 4. After 24 hour2s you receive a confirmation of successful unlisting.

In the case of the verified user

For any number of the verified user, firstly you have to deactivate your account.

  • Go to the TrueCaller App on your phone.
  • Click on the vertical dots(3) to open more options.
  • Go to the settings
  • Tap on the about option under the support tab.
  • Scroll down and click on the deactivate account
  • Tap on the yes
  • Now go to the official website of Truecaller and unlist the number by following the Steps mentioned up to 4.
  • A confirmation message regarding unlisting will be received. The contact number will be unlisted after 24 hours of making changes.

Read More: How to Change IMEI number on any Android Phone

However, the steps above will delete your number for the time being, but you have to make continuous checks as Truecaller doesn’t guarantee the permanent removal. We hope our guide to unlist contact number on truecaller is helpful for you. Share your issues or views via comments below.

How to Change IMEI number on any Android Phone

If you’re looking for a guide on how to change IMEI number of your phone, then this is the right page for you. People sometimes get the invalid IMEI  number problem on their phone, which can be fixed by changing the IMEI number of your Android Phone. Here in this article, we will guide you to change IMEI number on any Android Phone with root access and without root access.

Change IMEI number on any Android Phone

What is the IMEI number?

IMEI full form is International Mobile Equipment, It is a 15 digits long unique identification number for Mobile phones and Satellite Phones. It is written below the battery of the phone and you can also see it on the display of any phone by typing *#06# on the dialing pad. The IMEI number is used by GSM networks to identify valid devices and therefore can be used for stopping a stolen phone from accessing the network in that country.

It’s important to tell you that after changing the IMEI number of the Android Phone, Sometimes the apps which are installed on your phone are not working properly. To fix this issue you have to reinstall it from the Play Store.

How to Change the IMEI Number

To change the IMEI number of any phone is not a very tough task. You can easily change the IMEI number of your phone by following the guide below. There are two methods to change IMEI, one is with root access and another one is without root. We have listed both the methods, you can follow them to change IMEI number on any Android Phone.

[alert-warning]Note: Changing the IMEI number in some countries is illegal and sometimes the causes some errors in Apps installed on your phone. So you should think before changing the IMEI number of your phone. We are not responsible for any legal action, this article is just for education purposes. [/alert-warning]

Guide Change IMEI number with Root access

Here we assume that you have already rooted your Android phone. If you did not root your phone yet, You can see our guide on how to root Android Phone.  Moreover, you should install the Xposed framework from here. Now follow the instructions below.

  1. You have to find IMEI number of your Phone by just dialing *#06# and save it for future use in case you need it. However, you can find IMEI number of your can be accessible by going through the settings>> About Phone>> Status.
  2. Download the IMEI changer App, After that open the Xposed installer app and go to the modules and tick the checkbox on IMEI Changer App.
  3. You have to restart your Android Phone now.
  4. After phone reboots open the IMER changer app and you will then see the real IMEI number under the current IMEI number.
  5. You can enter the new IMEI number under the new IMEI no. After that, you have to tap on the Apply button at the bottom to change the IMEI no.
  6. Now the IMEI Changer app will show the new IMEI number under the current IMEI number box.
  7. You can reboot your device and recheck the IMEI number by dialing *#06#.

Also Read: How to format Pendrive using CMD (Command Line Prompt)?

Guide to change IMEI number of any Android Phone without root

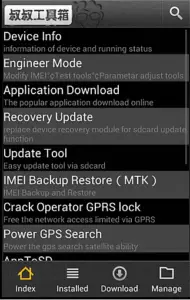
  1. Firstly download the Mobile uncle app on your phone and install it.
  2. Open the Mobile uncle App and select Engineer >> Engineer Mode MTK.
    Change IMEI number on any Android Phone
  3. Now search for CDS information option in the App and tap on it.
  4. Select Radio information option. After that, you will see the two options on screen i.e. Phone 1 and Phone 2.
  5. Select the Phone 2 option and you will see a new option called AT+.
  6. You have to Enter AT+ [Space] 15 digit new IMEI number. Like “AT+ 123456789012345”.
  7. After entering the new IMEI number you have to tap on the button Send At Command.
  8. After the process completes Reboot your Device and dial *#06# to recheck your new IMEI number.
  9. That’s it!!!

Also Read: How to disable Google Assistant on Android and iOS

Hope you successfully changed the IMEI number of your Android Phone. If you have any issue or feedback related to the methods given above, use the comment section below and ask us.

Best JioFi alternatives available to Buy

0

When Reliance Jio Industries Ltd deployed cheap 4G plans across India, not everyone has had 4G supported devices. Most of the average consumers weren’t able to afford 4G  smartphones and stuck with their 3G/2G devices. Jio was aware of it and as a first step to make the affordable 4G services accessible to the millions, the company launched JioFi – Jio’s WiFi Hotspot. JioFi is an affordable and paved way for 4G data speed on 3G devices with WiFi support.

JioFi Alternatives

The actual price of the JioFi first generation which was laucnhed a couple of years ago is around INR. 1,999/-. However, now it’s available up for grab even at INR. 999/- in certain e-commerce websites and outlets. Jio has launched multiple version of JioFi across the different price range. The Models of JioFi currently available include JioFi M1, JioFi M2S, JioFi JM61040, JMR 1140, JioFi 5 and so on. They offer varying specs at the different price range,

Nonetheless, Jio is not the only service provider offering portable WiFi hotspot. Other prominent players in the market are too in the race with their own custom made portable hotspot or the consumers. Here, we’ll have a look at the portable hotspots which may be a good alternative for JioFi as for you.

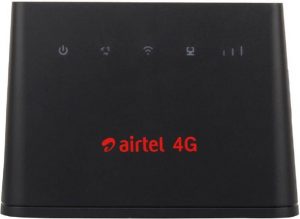
Airtel B310 4G ALL SIM SUPPORT HOTSPOT WIFI Router

Price: INR. 4990/-

The Airtel 4G Wi-Fi device is manufactured by HUAWEI  with Airtel Logo. Capable of delivering 150MBps high-speed internet to any connected devices, it also supports all SIMs, not just the Airtel. Note that, JioFI is SIM Locked and can be used only when Jio  SIM is inserted. Coming back to Airtel B310 a total of 32 devices can be connected ( 32 Wi-Fi + 1 LAN ) at a time.Airtel B310 4G ALL SIM SUPPORT HOTSPOT WIFI Router

As mentioned earlier, it is an unlocked device which can be used with any cellular networks all over the world. In India, the device supports JIO and All GSM Operators sim such as Airtel, Bsnl, Idea, Vodafone. The WiFi router is available for purchase in Amazon India and Flipkart.

Vodafone R217

Price: INR. 3000/-JioFi Alternatives

Yet another unlocked router which supports all Indian GSM operator SIM cards.  With the speed of 150Mbps and operating at 2.4GHz band, the Vodafone R217 supports only single-band. The router is light-weight and portable with matte finish design for easy grip. It weighs 150 g and comes in black color. Supports IEEE 802.11 b/g/n standard just like the JioFi 1. Consumers can purchase it from Amazon and Flipkart online.

Buy: Flipkart.

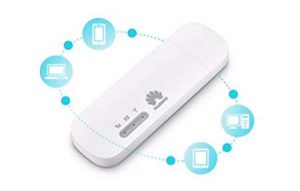
Huawei E8372 

Price: INR. 3085/-

Huawei E8372 is a 4G/LTE Wi-Fi dongle (wingle). Which means, it acts as both portable WiFi hotspot and traditional dongle with USB 2.0 male connector.  You can insert a sim card of your choice, as it is unlocked and then the device is ready to use. The Huawei E8372 has lightning fast download speed reaching up to 150 Mbps (Megabit per second). Use the dongle Mi-Fi with up to 10 different Wi-Fi enabled devices including laptops, iPhones, smartphones, iPad, tablets and gaming consoles, etc. The dongle can be plugged into the cars cigarette charger (you will need a car adapter) then you have immediate Wi-Fi in your vehicle.

As of the design, the wingle has a stylish and slim frame, taking no space in your bag. With its compact design, it would be hard to damage.

It’s available for purchase on Amazon.

Also Read: What is WiFi Direct and How to use it?

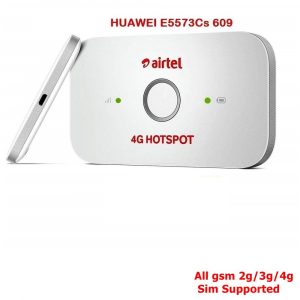
Airtel E5573cs

Price: INR. 2,599/-

Another Airtel 4G WiFi Hotspot manufactured by Huawei. It’s cheap and light compared the Airtel B310 modem.  You can connect up to 10 Devices, with the 1500 mAH battery its rated battery life is up to 6 hours. The modem provides a balance check option as well, so never afraid of data getting finished inadvertently when on-the-go. Weighing just 59 gram and having dimensions 11.2 x 7.6 x 3.6 cm, the Airtel E5573cs is a wonderful carry-on device.JioFi Alternatives

The product is available for purchase on Amazon and Flipkart.

Hopes you’d liked our alternatives for the JioFi. Drop in the comments, which one do you prefer and for what reasons. We’d like to hear from you.

How to Bold, Italic, Strikethrough, and Monospace in Whatsapp

Whatsapp is the most popular instant messaging app. It is downloaded over 1 Billion times, almost every smartphone user in the world has WhatsApp installed on their phone. People nowadays use Whatsapp as a primary mode of communication as it has instant messaging, Voice Call, Video Call, and some other features also. Some people also use Whatsapp for their online business. However, For Bussiness Whatsapp make a standalone with which you can communicate more efficiently with your customers, and help you grow your business.

Bold, Italic, Strikethrough, and Monospace in whatsapp

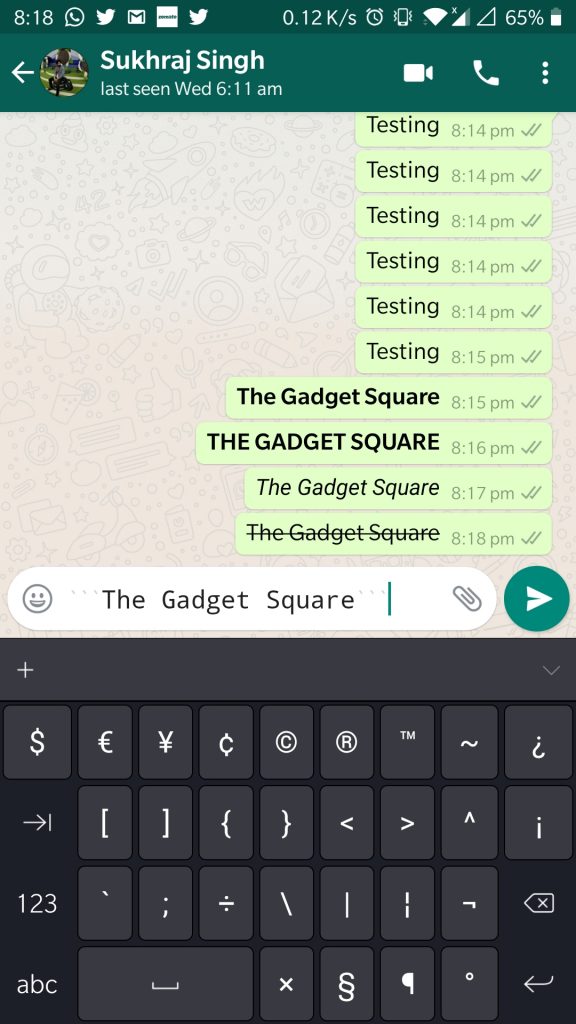
People Some time while sending a text message on Whatsapp need some formatting. Like some times you want to Bold, italics, and Strikethrough the text and you can easily format the text by following our guide how to Bold, Italics, and Strikethrough the text in Whatsapp.

Guide to Bold, Italics, and strikethrough the Text in Whatsapp

  1. Open the Whatsapp Messenger app from your Phone.
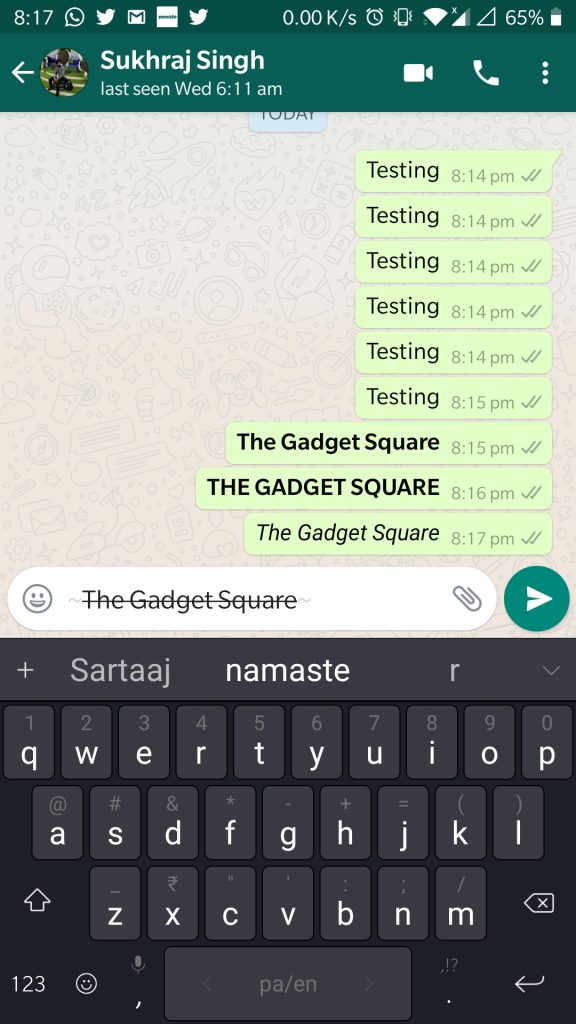
  2. To Add Bold formatting on text, You just have to put asterisk “*” before and after the text. For example, as you see the screenshot asterisk “*” is entered before and after THE GADGET SQUARE, and WhatsApp will automatically make it bold.
  3. If you want text formatting as Italic, You just have to enter underscore “_” before and after the text. For Example, As you see in the screenshot we just entered underscore “_” before and after The Gadget Square and it automatically comes Italic format.
    how to Italic in whatsapp
  4. If you want Strikethrough formatting on text, You just have to enter tilde “~before and after the text. For Example, As you see in the screenshot we just entered tilde “~” before and after The Gadget Square and it automatically comes Strikethrough format.
    how to Strikethrough in whatsapp
  5. If you want Monospace formatting on text, You just have to enter backtick “`” before and after the text. For Example, As you see in the screenshot we just entered backtick “`” before and after The Gadget Square and it automatically comes Monospace format.
    Monospace format in whatsapp

Also read: How to remove duplicates in Google Sheets

Alternative

  • Android: If you don’t like the above method to change the text formatting. Then you can also make the text Bold, Italic, Strikethrough, and monospace by tapping and holding the text which you want to change. After that, you will see a menu and now tap on More and you can select from the options which include Bold, Italic, Strikethrough, and monospace.
  • IOS: You can tap and hold the text you’re typing > BIU > and choose among bold, italic and strikethrough.

Best YouTube Video Editing Softwares you should check

0

Videos are the biggest and well-appreciated type of content these days on various social media networks. YouTube is the largest platform to host videos in an efficient and clear way. Before publishing a video, a lot of hard work is involved from recording to editing it. To increase the viewership and set a high standard on such a big platform, videos often requires skilled editing. In order to lure more viewers and improving engagements, the video should be properly edited. We have created a list of YouTube video editing software that you should check.

best video editing softwares

Gaining the faith of users is not as simple as it looks. It always needs attention and proper work towards what users demand and how the content creator is fulfilling them. That’s the reason we are sharing some best video editing software for YouTube to provide its users with the best video content.

Best Editing Softwares For YouTube

Wondershare Filmora9

While using YouTube on Windows and Mac, one of the best and highly recommendable software for editing is Wondershare Filmora9. It is considered as the best editing software for the beginners as well as for semi-pros. It gives the complete professional-looking videos. Wondershare Filmora9 entitles the YouTube story by using hundred of filters such as transitions, multiple effects of layering on audio and other elements for making the video professional.

Pros of Wondershare Filmora9

  • Easy to use– It contains all the tools that we ever need as a beginner in the world of video editing as it has big icons, interface, effects and efficient color for making your video royal. It also performs the trimming and cutting of video clips.
  • Sound Effects– An audio library of music tracks and sound effects make it the first choice for editing.
  • Advanced Features– It has many advanced features of PIP, Green Screen, video stabilization, Mosaic, etc.
  • Highly Compatible– It is suitable with the used formats of MP4, MKV, FLV, MOV, etc.

Adobe Premiere Pro

A video editing app developed by Adobe systems is a timeline-based video editing app. As a successor of Adobe Premiere, it was launched in 2003 and works towards professional video editing. Along with various filters and effects, it also adds titles to the videos. Premiere Pro can import video, audio, and graphics too. It can easily edit various video and still images together. The high-resolution video up to 10,240 x 8,192 resolution can be edited in RGB and YUV up to 32-bits per channel color.

Adobe Premiere Elements 11

It is among the first choice by the beginners from learning purpose as well as for representing professional videos. Premiere Elements is quite easy for users who are familiar with the Adobe suite for other tasks. It handles the unlimited video as well as audio tracks along with multiple effects. It holds the capabilities of Picture-in-Picture and Chrome key. For additional features, it supports third-party plug-ins as well.

Pinnacle Studio

Its built-in functionalities help the users by minimizing their workload. It has been rated as the easiest and provides the best value as it directly uploads a video on Facebook, YouTube, and other websites. Considered as one of the cheapest along with drag and drop HD video editing feature, more than 200 effects, templates, etc.

Pick the one, best suited to you for representing the professional video on the Youtube platform.