What is the HDMI full form – Types and Benefits?

In this competing world, there are many simple things which we hear, but we are not entirely familiar with them. On the one hand, the world is rapidly adopting new technologies, whereas on the other we are not even aware of their very basics or full form. Similarly, we widely use HDMI but don’t know what does it stands for? Let’s know HDMI full-form.

HDMI Full Form and other details

HDMI stands for High Definition Multimedia Interface which transmits signals in an uncompressed format.

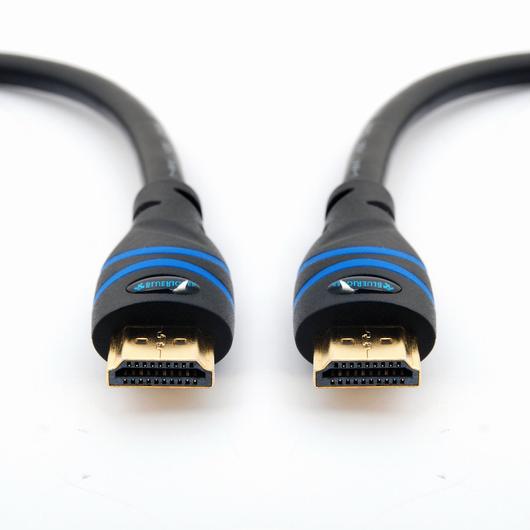
It comes as a digital audio-video interface along with a cable and connector. In late 2003, the production of HDMI began, and it released as the replacement for analogue audio-video standards as a digital one along with several versions. HDMI cable has two types:

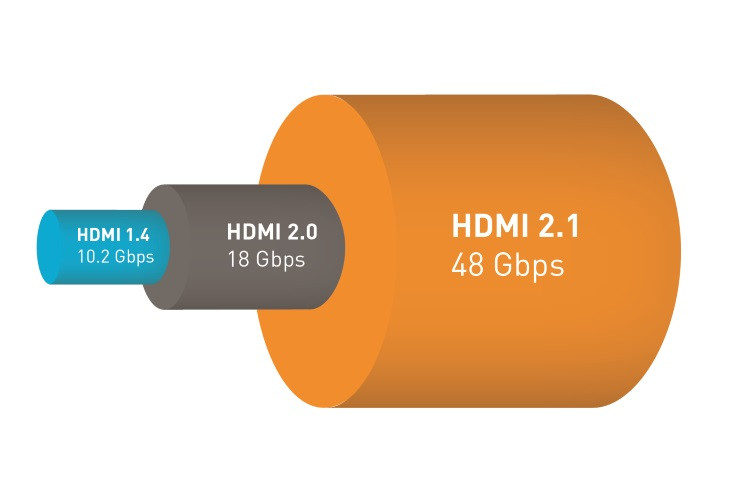
  • Standard Cable( Category 1 cable)- It is convenient to transmit an uncompressed 1080i signal, and it’s working pixel speeds is 75 Mhz along with the bandwidth of 2.23 Gbps.
  • High-Speed Cable(Category 2 cable)- It is convenient for the latest graphics display resolutions of WQXGA and 1440p having a working pixel speed of 340 Mhz along with the bandwidth of 10.2 Gbps.
  • HDMI 2.1: The HDMI 2.1 is the latest advancements in the HDMI technology. It can garner upto 48Gbps speeds.
Credits: PC Mag


Communication Channels

HDMI has mainly three communication channels:

  • Display Data Channel(DDC)
  • Transition-Minimised Differential Signaling(TMDS)
  • Consumer Electronics Control(CEC)

Connector Types in HDMI

High Definition Multimedia Interface has five types of connectors:

  • HDMI 1.0 – type A/B are defined
  • HDMI 1.3 – type C is defined
  • In HDMI 1.4 – type D is defined

Benefits of HDMI

  • Cost-Effective – It provides quality along with easy functionality in a cost-effective manner.
  • Backward Compatibility – It is highly compatible with the earlier interfaces such as DVI. It requires only one cable to connect DVI with HDMI.
  • Reduces Complexity – Its significant benefit is to reduce the confusion of cables behind the device by a single cable only. As HDMI has combined both audio and video within one cable and give relief from the jungle of cables.
  • High Quality – Uncompressed digital audio-video gets transferred to the highest quality. For pictures and sound quality, there is no match of HDMI as it renders deep colors of 30 bit,36 bit and 48 bit. It supplies a superb sound quality without any interference of noise.

Read More: What is the GPRS full form?

These various well-fitted benefits of HDMI makes it highly recommendable in today’s world of technology. 
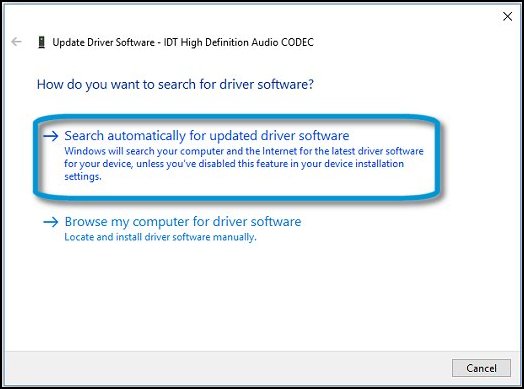
Best Solarmovie alternatives to Watch Movies Online

0

As you might know, nowadays there is a large amount of content is created and published every day. The Web series of various online streaming services like Netflix and Amazon Prime are becoming more popular nowadays. If you want to watch these Web series and Movies online you can buy the premium membership of these streaming services. However, if you want to try these first or want to watch free, sites like Solarmovie will help you. Solarmovie is an online streaming website which provides the Movies, TV-Series and Web Series for free. If you can’t access the Solarmovie platform in any part of the world. You can try some of the best Solarmovie alternatives from the list given below.

solarmovie alternatives

[alert-note] Note: We have not any intentions to promote piracy. We have written this article just for those people who want to try the content of various premium streaming services. This is just an informatory article. [/alert-note]

Best Solarmovie Alternative

All the alternatives of Solarmovie are tested and live at the time article is published. We have listed these site according to there features and how easy to use it is.

CmoviesHD

CmoviesHD is an online Streaming service like Solarmovie. It Features the latest Movies and TV Series for online streaming. Due to copyright and piracy reasons the website reform itself. Now CmoviesHD does not actually host any file on its server, all the Movies and Web series are linked to the other third-party sites. So all the movies on CmoviesHD are not illegal. CMoviesHD has a very easy user interface and you don’t need any Sign-up to use the website.  It has a large amount of content which includes Movies, TV shows, Web-series, etc.

123Movies

It is a very popular Free Movie, TV shows streaming website. When you search on any search engine for free movies you will see 123movies in search results. Moreover, the Motion Picture Association of America declared 123movies is the most popular illegal movie website. The official website of 123movies is shut down, but the site is still working on various mirrors of it which you can find very easily by searching no Google. We recommend you that don’t use this service without a VPN.

Also Read:Best Digital Wallets in India

Yify

It is one of the best and popular Solarmovie alternative. Yify also provides you the Movies and TV shows for free to watch online. Earlier it was a torrent website but later they converted it into the online streaming service for Movies and TV shows.  Yify will provide the best experience for those who want to download movies or watch them online. The best part is that the majority of the content is available in HD and you can watch it without facing any buffering issues.

YesMovies

YesMovies also offer free Movies and TV Shows online just like Solarmovie. It has quite simple user-interface with a lot of categories and options visible to filter the content. You can play the content with on single click and in yesmovies you have always 2-3 hosts from where the content (movie/ TV series) is being played.

Putlockers

It is also widely used for Watching free online movies and TV Shows. It gives you the easy user interface to navigate through the content. You can sort the movies by the genre or year of release. The most important thing is that the website is very fast and doesn’t lag while you play Movies.

M4ufree

It is one of the best alternatives of Solarmoive right now present on the web. It provides you Free Movies and TV shoes online without any registration or login on the website. There are some websites who are streaming the movies and TV shows which are new and sometimes the streaming links for the old movies and shows are broken. M4ufree doesn’t have this issue and provide the same preference to an old or new movie.

Also Read: Best Google Chrome Tab Managers

That’s it hope you like our list of best Solarmovie Alternatives. we do recommend that you should use a VPN while watching content from these websites. If you have any suggestion you can comment below.

What is Bluetooth 5.0 and its features?

Bluetooth 5.0 was launched on  16 June 2016 and it is mainly focused on the internet of things IoT. The main highlight of Bluetooth 5.0 is the working range i.e. up to 250 m (800 ft.) approx. It also has a big improvement in the data transfer speed which nearly doubled when compared to Bluetooth 4.0. Samsung Galaxy S8 is the first phone that supports Bluetooth 5.0 in April 2017.  In this article, we will describe what is Bluetooth 5.0 and all its features in Detail.

Bluetooth 5.0 Features

What is Bluetooth?

Bluetooth is a short-range wireless technology which is mostly used to transfer data from one device to another. Bluetooth support is present in all type of devices like Smartphones, Tablets, Laptops, and Computers, etc. It works on Bands from 2400 GHz to 2485 GHz.

Bluetooth Special interest group (SIG) Manages the Bluetooth and it develops new features and many other improvements. It has 30,000 member companies who are using the Bluetooth in Telecommunication, computing, networking, and consumer electronics.

Bluetooth 5.0 History

After the Bluetooth 4. 2 which includes the low Energy consuming secure connection to transfer data. Now there is a need for better Speed and Range so here comes the need of Bluetooth 5.0. It was first announced on 16th June 2016, although the first smartphone with Bluetooth 5.0 Support launched in April 2017. After that, it features in almost all the flagship devices.

Features of Bluetooth 5.0

Bluetooth 5.0 Features

  1. The Data transfer speed is improved from the 1 Mbps of Bluetooth 4.2 to 2 Mbps. Which means you can save some time while transferring the files.
  2. In Bluetooth 5.0 Beacons are used to transmit radio waves. Beacons are the small wireless devices embedded in Bluetooth 5.0. It makes the connection stronger.
  3. It also has more range than the previous version of the Bluetooth 4.2. As we already wrote above the range of Bluetooth 5.0 is approximately 250m (800ft).
  4. Bluetooth 5.0 Provides big improvements in the BLE mode, which is usually used for IoT devices. BLE data transfer speed is also increased.
  5. LE Advertising Extensions now can hold up to 255 bytes of data which is quite more than the previous 37 bytes in Bluetooth 4.0. Which means you can send data files more securely and fastly.

We hope you understand the main features of Bluetooth 5.0 which have eased out some of our smartphone problems.

Also Read: What is WiFi Direct and How to use it?

Now we are waiting for Bluetooth 5.2 for more advancements. Share your feedback about Bluetooth 5.0 via comments below or which feature you want in the next Bluetooth version.

What is the AM and PM Full Form?

The 24 hours of a day is divided into 2 time periods of 12 Hours each. These two time Periods are named as AM and PM which means Anti Meridiem and Post Meridiem respectively. Full Form of AM(Anti Meridiem) and PM(Post Meridiem) means before midday and post midday. The 12 hour time convention is mostly used in English speaking areas and former British colonies.

AM PM Full form

Clock System
12-hour 24-hour
12:00 (midnight) 0:00 (beginning of the day)
12:01 am 0:01
1:00 am 1:00
2:00 am 2:00
3:00 am 3:00
4:00 am 4:00
5:00 am 5:00
6:00 am 6:00
7:00 am 7:00
8:00 am 8:00
9:00 am 9:00
10:00 am 10:00
11:00 am 11:00
12:00 (Noon) 12:00
12:01 pm 12:01
1:00 pm 13:00
2:00 pm 14:00
3:00 pm 15:00
4:00 pm 16:00
5:00 pm 17:00
6:00 pm 18:00
7:00 pm 19:00
8:00 pm 20:00
9:00 pm 21:00
10:00 pm 22:00
11:00 pm 23:00
12:00 pm(Midnight) 24:00 (end of the day)

In 12 Hour clock system to remove confusion, we use the AM and PM with time. For example, 5 AM is early in the morning and 5 PM is late in the afternoon. There are one more confusion i.e. 12 AM and 12 PM that’s why it is advised 12 noon instead of 12 PM and 12 midnight instead of 12 AM.

Also Read: How to disable Google Assistant on Android and iOS

Most of the computers and operating systems use 24-hour notation. Although users activate the 12-hour notation form the time and date settings of their operating system. However, As we show in the table above AM represents the time from midnight to noon. (12:00 AM to 11:59 AM) and PM represents the time from noon to just before midnight. (12 PM to 11:59 PM).

Best Google Chrome Tab Managers

Google Chrome is one of the most popular internet browsers available in the market. It is available on almost all devices with internet connectivity including smartphones, computers, and smart TVs. Though Chrome is well-known for its simplicity and usability, it is also notorious for poor RAM usage. Hence, tab managers are recommended to manage tabs if you have a habit of opening a large number of tabs. Also, they are very useful if you use a number of machines at work and at home.

Google Chrome Tab Manager

Thus, here in this article, we will help you find the best suitable tab manager for Google Chrome. We tried out several tab managers for Google Chrome ourselves to come up with the list below. Do note that only the first three are tab managers whereas the last two are simply used to hibernate or suspend tabs to reduce the RAM usage.

Best Chrome Tab Managers

We have listed the Google Chrome Tab Managers according to its popularity and features.

Toby for Chrome

Best-Tab-Manager-Google-Chrome-Toby-for-Chrome

Toby for Chrome is the very first tab manager for Google Chrome that comes into our mind. All because of its wonderful features and design. The best of which is the ability to cloud sync up your tabs so that you can easily start where you left off across different machines. The user can even create collections of their tabs which is really great to manage tabs based on different usage or category.

It also supports keyboard shortcuts and has a dark theme as well. Toby for Chrome is literally the best tab manager for Google Chrome according to our usage and testing.

Download

Session Buddy

Tab Manager Google Chrome Session Buddy
Session Buddy

Session Buddy is our second best choice for best tab manager for Google Chrome. It has exactly the same features as Toby for Chrome except for cloud sync option. However, it has export and import tabs functionality to make up for it.

Download

OneTab

Best-Tab-Manager-Google-Chrome-OneTab

OneTab is similar to Toby for Chrome and Session Buddy sans cloud sync and modern design. As the name suggests, a single tab is used to manage all other tabs. To use it, the user has to simply click the OneTab icon on the top right corner of Google Chrome. Once clicked, all of your opened tabs are listed into the single tab. Now, from there, the user has various options to manage those tabs.

Also Read: Best Google Chrome Themes Of 2013

This tab manager plugin allows users to share their tabs to other users as well. Also, they can export or import those tabs so they can open it can easily open it on other machines.

Download

The Great Suspender

Best-Tab-Manager-Google-Chrome-The-Great-Suspender

The Great Suspender works on a simple principle of suspending tabs automatically based on the preferences set. It is very easy to use too as users have to simply set the desired time after which the opened tabs should get suspended. Thus, reducing the RAM usage which is the biggest con of Google Chrome or any other modern browser.

It also has various features including whitelisting specific URLs, preventing a webpage with user input forms or playing audio to suspend, improving performance while restarting Chrome with multiple tabs, etc.

Download

Tab Hibernation

Best-Tab-Manager-Google-Chrome-Tab-Hibernation

Tab Hibernation is another plugin to manage tabs in Google Chrome. It is somewhat similar to the Great Suspender in terms of working. But it does not come with additional features and functionalities that the former has. As a plus point, the user does not have to go through settings as it lacks it. To suspend the tabs, the user has to simply click on the Tab Hibernation plugin icon located on the top right corner of Google Chrome.

Download

Hope you found the best suitable tab manager for Google Chrome from our list. Make sure to comment below if you have any other suggestions or queries.

Fix No Audio Device is Installed error on Windows PC

0

Windows PC’s could act up intermittently for no obvious reasons. Among the issues which are common in most of the Windows PC’s out, there is No Audio device installed error. Or it appears as ‘No Audio Output Device is installed‘ message and literally no sound output. In case if you’re meddling with the issue, then here are some troubleshoot methods you can try.

Fix No Audio Device is Installed error

Below we’d provide troubleshooting methods on Windows 8 and 10.

How to fix No Audio Device is Installed error on Windows 10 / 8

Method 1 – Run the sound problems troubleshooter

Automatically identify and fix audio errors with the Windows sound troubleshooting tool.
  1. Right-click the notification area speaker icon , and then select Troubleshoot sound problems.
  2. Select the device you want to troubleshoot, and then click Next to start the troubleshooter.
  3. If a recommended action displays, select Apply this fix and then test for sound.

Method 2 – Check device and driver status in Device Manager

An outdated audio driver can cause sound errors and issues. Use Device Manager to check if the audio device is disabled, and then install an available driver update.
  1. In Windows, search for and open Device Manager.
  2. Double-click Sound, video and game controllers.
  3. Right-click the audio device, and then select Update Driver.
  4. Click Search automatically for updated driver software to check for and install a driver.How to fix No Audio Device is Installed

    • If an updated driver installs, restart the computer if prompted, and then test for sound.
    • If an updated driver is not available, continue to the next step to reinstall the existing driver.
  5. Right-click the audio device again, and then select Uninstall to open the Uninstall Device windowHow to fix No Audio Device is Installed
  6. Select Delete the driver software for this device, and then click Uninstall.
  7. In the top menu bar, click Action, and then select Scan for hardware changes to reinstall the device.
  8. Test for sound.
    • If there is no sound, right-click the Sound icon in the notification area, select Playback devices, and then reconnect your audio device if it is not listed. Once listed, click the device name, click the Sounds tab, select a sound, and then click Test.
    • If the device is not listed in Playback devices, restart the computer, and then check if the device displays in the list.

Method 3 – Check the playback device setup and connection

To check playback device status in the sound settings and check the device connection, go through the steps given below.
  1. Right-click the notification area speaker icon , and then select Playback devices.
  2. Confirm the device is listed and has a green check mark. This indicates it is the default device. If necessary, right-click the device name, select Set as Default Device, and then test the device.
    • For cable connections, make sure the device connects to the correct port, and that the connection is secure. Additionally, reconnect the device in case the computer did not detect it when you previously connected it.
    • For wireless connections, make sure the device is configured and paired to the PC.

      Check the device connected to the computer.

Even after trying the above mentioned three methods, it can be somewhat inferred that the problem is with your sound system or the audio peripheral. It’s recommended to test with a different playback device and check your specifications for any additional sound requirements.

Also Read: How to change mouse DPI on Windows and MacOS

If everything is fine with the audio hardware, try to do a restore.

Use Microsoft System Restore or HP System Recovery

If the audio error persists, use Microsoft System Restore or HP System Recovery to fix the problem.
  • Go to Microsoft System Restore (Windows 10, 8) to restore your computer to a previous state when the sound was working
If the error still displays, better approach a recognized service center of that computer’s manufacturer.

What is WiFi Direct and How to use it?

WiFI Direct allows two devices to establish a direct connection through which you can share any type of files. WiFi Direct is a Certificate of the WiFI Alliance. which includes almost all the major manufacturers of Phones, Tablets, and Laptops. It’s important to tell you that Samsung Galaxy S was the first Android Device to have WiFi Direct. Although after Android 4.0 Ice Cream Sandwich all the android phones includes the WiFi direct.

What is wifi Direct and how to use

Moreover, WiFi  Direct can also be used with Micracast to cast the screen of your device on a display. The newest generation of WiFi direct is also compatible with NFC. When we are talking about the technicalities of WiFi Direct, then it’s way better than Bluetooth connection. In WiFi Direct when a device comes into the range of host, it connects to it and gathers the protected setup transfer information.  Which make the connection very easy for both the sender and recipient.

Also Read: What is Bluetooth 4.0 and its Features?

As I mentioned above WiFi Direct is now available on various devices like Laptops, Televisions, Tablets, and Smartphones. First, we will talk about Smartphones.

How to use WiFi Direct on Smartphones

Google has launched WiFi Direct Support with the Android 4.0 Ice Cream Sandwich. Although Samsung features the WiFi Direct in its Galaxy S. To use WiFi Direct is very simple by following the steps below.

  1. Tap on the settings of your Phone and Connections/WiFi.
  2. Make sure your WiFi is enabled on your Phone to access the WiFi Direct.
    How to use WiFi Direct on Smartphones
  3. Now select WiFi Direct. Locate and select the device with which you would like to connect and transfer the data. After tapping on the device name you have to accept the invitation on the phone which you have selected.
  4. After connecting to another phone. If you want to send a file you have to tap on it and share it via WiFi Direct. On the recipient phone, you have to accept the sharing request to receive that file.
  5. Now after data transfer just tap on the phone name in the WiFi Direct settings to disconnect.

We hope you have easily transferred your data from one phone to another using WiFi Direct. If you got some issues then do ask us via the comments section below.


How to change mouse DPI – Windows and MacOS

If you are looking for a guide on how to change mouse DPI on your Windows PC or MacOS machine, you are in the right place. Here in this article, we will guide you step by step on how to change the DPI of your mouse.

change mouse DPI

The mouse is an essential device of a computer system. Imagine using a Windows PC or MacOS machine without a mouse. Though it is possible with a keyboard, it is not feasible in the long run. The sensitivity of the mouse is measured in DPI which stands for Dots Per Linear Inch. Tweaking the DPI settings can result in the sensitivity you are looking for a particular task.

A computer is a multitasking machine. It can be used for many things including gaming, photo, and video editing, word processing, internet browsing, and what not. But all these things may require different DPI settings (sensitivity) based on your usage. Though it is not necessary to change DPI literally for every task, however, it may yield a better result (precision) especially while gaming and photo editing.

Also Read: How to Reduce Printing Cost

How to change mouse DPI in Windows PC

  • Open Control Panel on your Windows PC / Laptop.
  • If your view is in either small icons or large icons, then the mouse icon will be displayed there itself.

Control-Panel-View-Large-Icons

  • However, if your view is in the category, then go to Hardware and Sound and select Mouse under Devices and Printers.
  • It is better to change the view to large icons and select Mouse easily from there.
  • Once you have opened the Mouse settings, then select the Pointer Options tab.

https://thegadgetsquare.com/wp-content/uploads/2019/04/Control-Panel-Mouse-Pointer-Options

  • Now, under the motion section, there will be a slider to control the mouse pointer speed.
  • The mouse pointer speed is nothing but the DPI size which results in the sensitivity of the mouse.
  • Change the mouse pointer speed as per your need by dragging the slider and check how it works.
  • If you are satisfied with the change, then click on Apply followed by OK to save the settings.

Control Panel Mouse Pointer Speed

  • There’s another option named Enhance pointer precision with a checkbox below the slider.
  • Enabling it will give you more control over the pointer especially while moving the mouse pointer over a smaller distance.
  • It works on the basis of the movement of the mouse. If you move the mouse faster, then the pointer accelerates, whereas while moving it slower, the pointer decelerates.
  • Thus, it is beneficial for editing photos and other similar tasks.
  • On the other hand, it is strictly advised not to enable Enhance pointer precision for gaming.
  • That’s it. You have successfully changed the mouse DPI on your Windows PC.

Also Read: How to Install Windows OS on Android

How to change mouse DPI in MacOS

  • Open the Apple menu by clicking on the ‘Apple logo‘ located at the top left corner.
  • Select System Preferences and then click on Mouse option denoted by a mouse icon.
  • Then, select the Point & Click tab to proceed further.
  • Now drag the Tracking speed slider to change the mouse DPI as per your requirement.
  • Once you are done, click on the red exit button located at the top left corner to save your setting.

Thus, from the above guide, you must have now successfully changed the mouse DPI of your Windows / MacOS machine. In case, you have any query, feel free to drop them in the comment section below. We will get back to you as soon as possible.

How to Install Windows OS on Android

Nowadays, smartphones/tablets are so powerful that, they are no less of PC’s or Laptops. Smartphones/tablets boasting 8GB+ RAM and CPU clocked over 2GHz and more rules the smartphone market. In short, these smartphones are now capable of running the Windows operating system. More powerful the device much better it runs the Windows.

Here, have a glance at our guide for installing any Windows OS(7,8,8.1,10) on your any Android device. However, it may be misleading to use the term installing because we are actually emulating. For that, we are using Limbo – a PC emulator for Android. It is to be noted that, there exist plenty of other PC emulators for Android over PlayStore. But, in this guide, we gonna proceed with only Limbo, due to its simplicity over other emulators. Limbo PC Emulator is a port of QEMU (Quick Emulator) and dependent libraries for Android Devices

Prerequisites

  • Android devices: Better be devices running Android v4.4 or above. At least 2GB of RAM and octa-core processor recommended
  • Limbo PC emulator installed on the device
  • ISO/IMG Image file of Windows OS to be emulated
  • Patience to wait for 10-15min while the emulator boots the Windows OS completely.

Also Read: What is SIM? Full form, Features, Types and More

Steps to run Windows OS on Android Devices

Below, you could find steps for running Windows XP via Limbo.

  1. Install Limbo PC Emulator: Download Limbo from the Play Store and install it on your Android device
  2. Windows image file: Download image file of the required Windows version and place it in a suitable directory in your device
  3. Open Limbo app: Click on Load Machine option and click New
  4. Create New Machine by entering any name. Here, XP
  5.  Choose the following settings:
  • for CPU/Board;
Architecture x86
Machine Type PC
CPU Model Default
Core 1
RAM 512MB(for running Windows 8 or above requires more ram)


  • Under Storage option;

Tick harddisk A and choose the path of the Windows XP image file.

Drag down and go to User Interface settings on Limbo App;

  • Choose Interface as SDL

Orientation = Landscape

6. Now you are ready to go. Leave all other settings as itself. Run the program by clicking play button. Wait 10-15min to complete the loading of Windows XP.

Although, depending on the capability of device you may run the latest Windows 10 with much ease. But, cannot install or execute any Windows software (.exe file) as in a PC or laptop.

Also Read:How to Reduce Printing Cost

In this guide, we have provided you the procedure to emulate Windows OS on any Android device. The method is safe as it doesn’t involve altering or removing the existing Android OS on your device.

At the same time, there do exist methods, in which one can clean install/flash the Windows by replacing the in-built OS on your device. However, the process is tedious and only for hardcore Android users. It may even cause your device to be bricked and useless if handled improperly.

Note: Currently, Android or iOS is the best optimized operating system for smartphones. Even the Windows mobile operating system failed to outshine the above both. So, I personally recommend you to stick with the Android OS and doesn’t subject your device to the incompatible OS. Stay safe.

Best Photo viewer for Windows 10

0

If you’re bored of the Windows photo viewer of Windows 10 for viewing images. Then you’ve landed on a perfect Page, here we will list some of the best photo viewer for Windows 10. Windows Photo Viewer which is stock software of Windows 10 comes with only basic previewing and editing features. Sometimes users feel it is very slow and want to try some other photo viewer. There are lots of 3rd party software and apps for Photo Viewing from which we have selected some of the best in the following list.

Best Photo Viewer Windows 10

We have made this best of guide on the basis of Popularity and features provided by that particular software or app.

Best Photo Viewers for Windows 10

IrfanView

It is very popular 3rd party photo viewer software for Windows 10. It works very efficiently on Windows 10 and lower version of windows as well. Irfanview is developed by Irfan Sklijan and it is free to use. It supports a huge list of file formats which includes BMP, GIF, JPEG, JP2 & JPM, PNG, TIFF, RAW, ECW, EMF, FSH, ICO, PCX, PBM, PDF, PGM, PPM, TGA, Flash, Ogg and text files.

IrfanView

Irfanview with all these file format support has some useful image editing tools like crop, resizing, format conversion, etc. As the software has a huge list of features in it as we written here and still weighs around 2 MB space on your hard disk.  So Irfanview is the best alternative for Windows Photo Viewers (Photos).

Download IrfanView

FastStone

It is also one of the best photo viewer  Windows 10. FastStone Image Viewer is a fast and reliable image viewer with editing tools. In this, we can make a slideshow of images with many attractive transition effect. Along with these, FastStone Image Viewer includes multi-monitor configuration which is very useful while selecting the large no. of photos.

FastStone

In this software, you can perform actions like resizing the images in a batch of files. However, FastStone Image viewer supports BMP, JPEG, JPEG 2000, GIF, PNG, PCX, TIFF, WMF, ICO, and TGA), RAW file formats. It’s important to tell you that users have reported that while scrolling sometimes the Faststone image viewer becomes slow.

Download Faststone

XnView

It is also one of the best and widely used Photo Viewer for Windows 10. XnView can open almost any type of image on your PC as it supports more than 500 file formats. In XnView, you can view the photo in standard thumbnail and in fullscreen view also.

XnView

It also includes the slideshow and filestrip features with FX option. The most useful feature in XnView is Duplicate file finder which searched your PC for any duplicate images. It also supports the batch processing and batch renaming with which we can save some time.

 Download XnView

Nomacs

Nomacs

It is also a very good alternative of Windows photo viewer. Nomacs is packed with various wide range of features and functions which includes all the basic editing tools like cropping, rotating and resizing. It supports almost all the image file format like RAW and PSD files. Nomacs also has a feature to capture screen.

Download Nomacs

Picassa

It is very easy and useful Photo Viewer software for Windows 10. While viewing the photos in Picassa you can press any key to see that photo in full-screen mode. Moreover, you can start a slideshow of images which you are viewing in a single click. Picassa can scan your computer for photos and organize it for you.

picasa

However, Picassa is now not available officially from Google. Google is now offering its Google Photos service which is totally based on the web. However, you can still use Picassa by downloading it from 3rd party software vendors.

Download Picassa 

We hope after going through this best photo viewer windows 10 guide, you can make a decision which one is more suitable for you. If you have any problems in downloading or any other query you can do that via comments below.