
If you are looking for a guide on how to change mouse DPI on your Windows PC or MacOS machine, you are in the right place. Here in this article, we will guide you step by step on how to change the DPI of your mouse.

The mouse is an essential device of a computer system. Imagine using a Windows PC or MacOS machine without a mouse. Though it is possible with a keyboard, it is not feasible in the long run. The sensitivity of the mouse is measured in DPI which stands for Dots Per Linear Inch. Tweaking the DPI settings can result in the sensitivity you are looking for a particular task.
A computer is a multitasking machine. It can be used for many things including gaming, photo, and video editing, word processing, internet browsing, and what not. But all these things may require different DPI settings (sensitivity) based on your usage. Though it is not necessary to change DPI literally for every task, however, it may yield a better result (precision) especially while gaming and photo editing.
Also Read: How to Reduce Printing Cost
How to change mouse DPI in Windows PC
- Open Control Panel on your Windows PC / Laptop.
- If your view is in either small icons or large icons, then the mouse icon will be displayed there itself.
![]()
- However, if your view is in the category, then go to Hardware and Sound and select Mouse under Devices and Printers.
- It is better to change the view to large icons and select Mouse easily from there.
- Once you have opened the Mouse settings, then select the Pointer Options tab.

- Now, under the motion section, there will be a slider to control the mouse pointer speed.
- The mouse pointer speed is nothing but the DPI size which results in the sensitivity of the mouse.
- Change the mouse pointer speed as per your need by dragging the slider and check how it works.
- If you are satisfied with the change, then click on Apply followed by OK to save the settings.
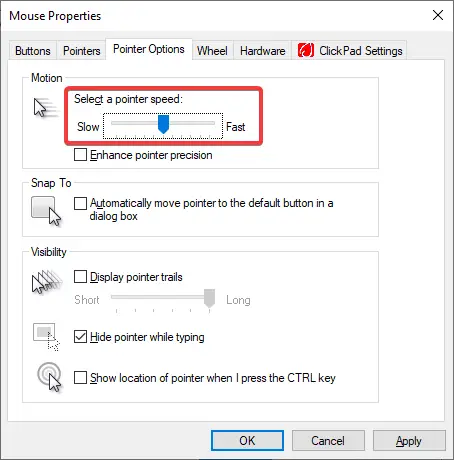
- There’s another option named Enhance pointer precision with a checkbox below the slider.
- Enabling it will give you more control over the pointer especially while moving the mouse pointer over a smaller distance.
- It works on the basis of the movement of the mouse. If you move the mouse faster, then the pointer accelerates, whereas while moving it slower, the pointer decelerates.
- Thus, it is beneficial for editing photos and other similar tasks.
- On the other hand, it is strictly advised not to enable Enhance pointer precision for gaming.
- That’s it. You have successfully changed the mouse DPI on your Windows PC.
Also Read: How to Install Windows OS on Android
How to change mouse DPI in MacOS
- Open the Apple menu by clicking on the ‘Apple logo‘ located at the top left corner.
- Select System Preferences and then click on Mouse option denoted by a mouse icon.
- Then, select the Point & Click tab to proceed further.
- Now drag the Tracking speed slider to change the mouse DPI as per your requirement.
- Once you are done, click on the red exit button located at the top left corner to save your setting.
Thus, from the above guide, you must have now successfully changed the mouse DPI of your Windows / MacOS machine. In case, you have any query, feel free to drop them in the comment section below. We will get back to you as soon as possible.